Getting started
System requirements & Installation
To start using Sign.UseWise® all you need is a Microsoft 365 subscription and an Internet-enabled workstation with one of the modern web browsers to get started.
Sign.UseWise® app is available on both Microsoft Azure and Microsoft AppSource Marketplace. To get started with Sign.UseWise® app, go to https://usewise.app/sign-usewise/sign-usewise-microsoft-365 and select your marketplace from where you want to purchase the app – Microsoft Azure or AppSource marketplace.
Once you install the app, you will need to install the Sign.UseWise® Outlook add-in, which enables the insertion of email signatures into Outlook. A Microsoft 365 global administrator is required to deploy this add-in to users, specific groups, or the entire organization through the Microsoft 365 admin center. You can learn more about add-in installation from the application settings.
Outlook add-in installation
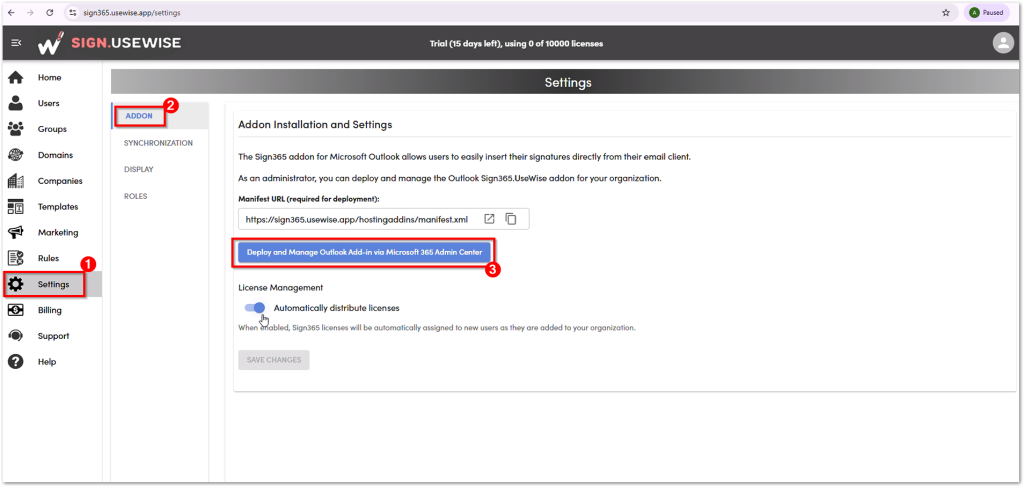
Once you install Sign.UseWise® app from the marketplace, you will need to install the Sign.UseWise® Outlook add-in separately, which enables the insertion of email signatures into Outlook. A Microsoft 365 global administrator is required to deploy this add-in to users, specific groups, or the entire organization through the Microsoft 365 admin center.
To install the add-in, follow these steps:
- Go to Sign.UseWise® application Settings and select the Add-on menu.
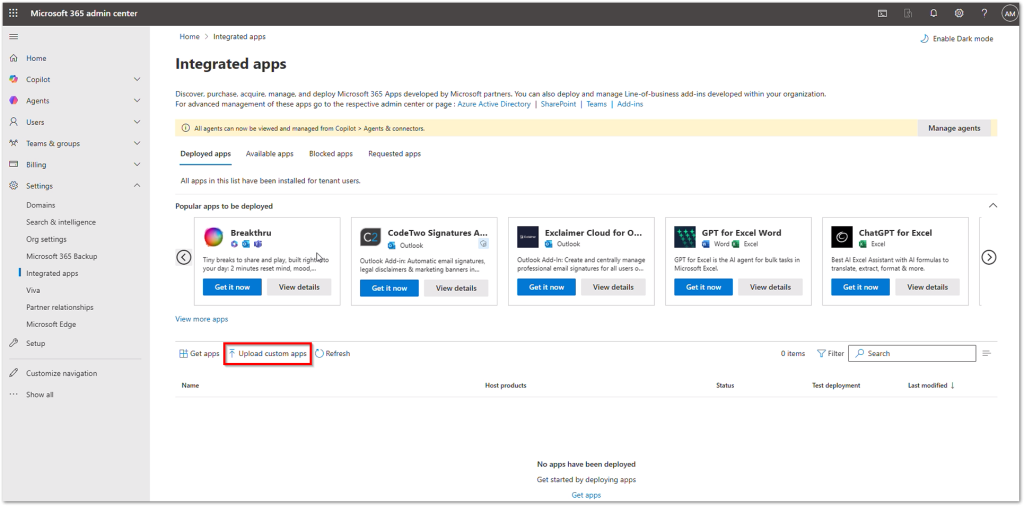
- Click on the button “Deploy and Manage Outlook add-in via Microsoft 365 Admin center”. This will take you to the Microsoft 365 admin center.
- In the admin center, click on the Upload custom apps option.
- The sidebar will open. Select app type Office add-in and select Provide link to manifest file. Come back to Sign.UseWise® app tab and copy the link to the manifest file from the add-in page. Paste the link and click Validate. Once the manifest is validated, click Next.
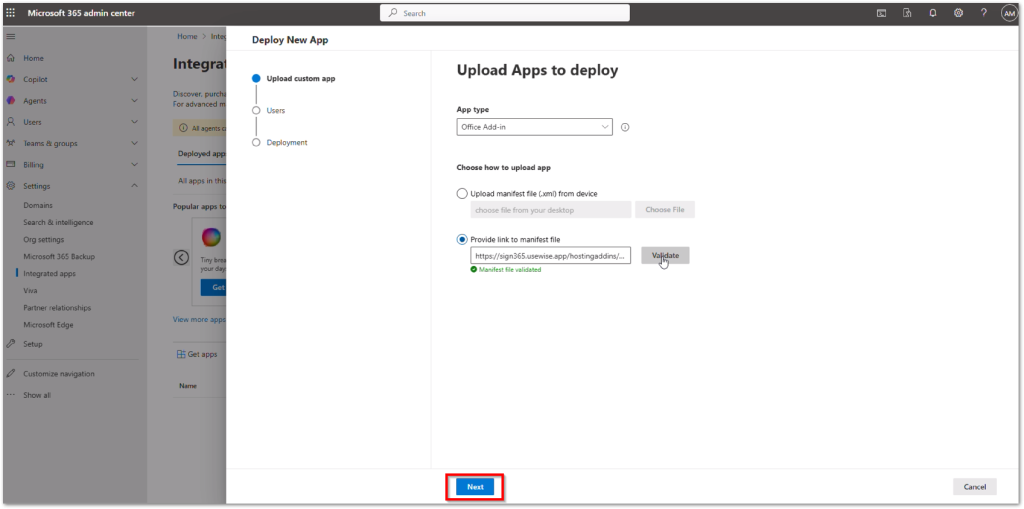
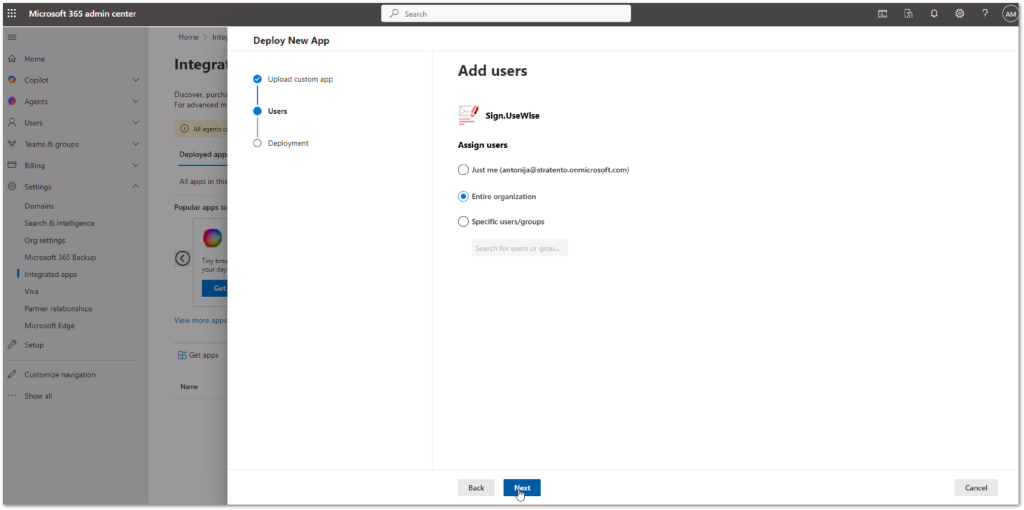
- In the next step, you can choose whether you want to install the add-in for specific users, groups, or for everyone on your domain. Make your selection and click Next.
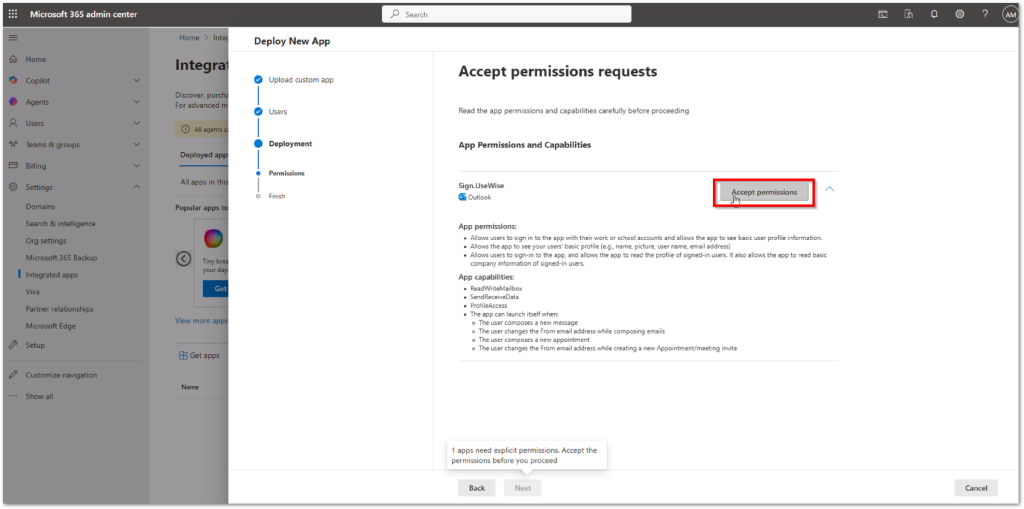
- The final step is accepting the permissions. Select Accept permissions. You might need to sign in again to confirm the requested access. After that, just hit Next and Finish deployment.
- It’ll take a few minutes to process, but you’ll see a notification in the sidebar when deployment is complete. Then, simply click Done.
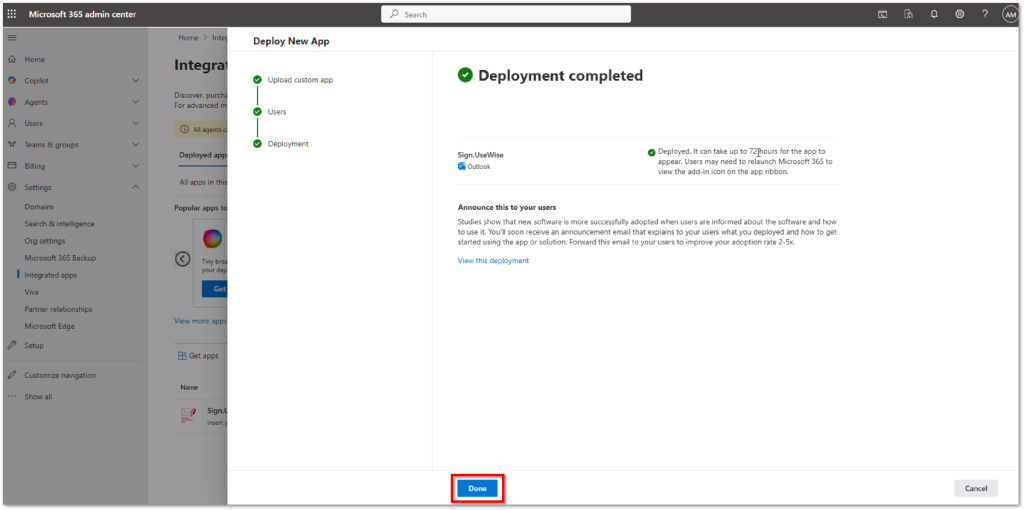
Note: It may take some time (up to 72 hours) for the add-in to appear in the user’s Outlook. Once the deployment is finished, you can start creating and assigning email signatures to users via rules.
Overview and guide
Home page
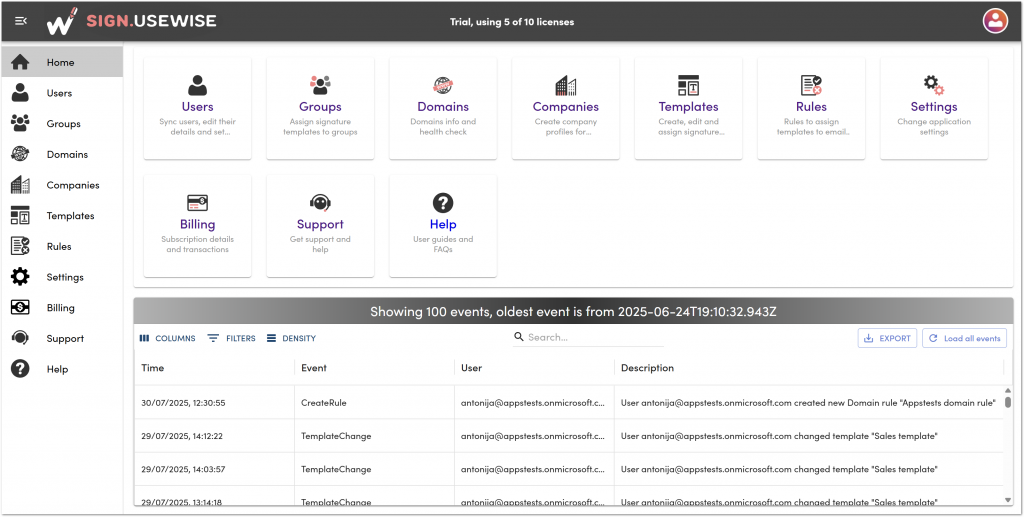
The home page is a starting point from which you can access all pages and key features of the application, such as users, groups, domains, and others, either by using the left sidebar or the central pane.
The Events Log table in Sign.UseWise® provides a record of all activities, noting the exact time and date each event occurred and the email address of the administrator who performed it.
Users
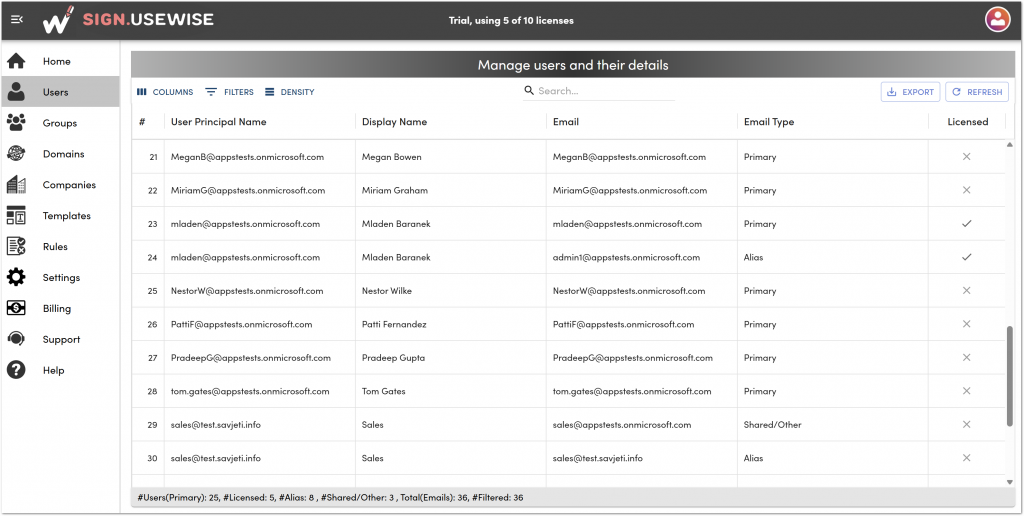
The Users page provides a comprehensive view of all users and their email addresses within your tenant. You can easily find specific users by using the search bar at the top or refining your results using the filtering options (by ID, name, email, etc.) in the top left corner of the table.
In the top right corner, you can export the user list as a CSV or Excel file, or print it to save as a PDF. The Refresh option will synchronize the user data with Azure AD to reflect the latest changes.
Groups
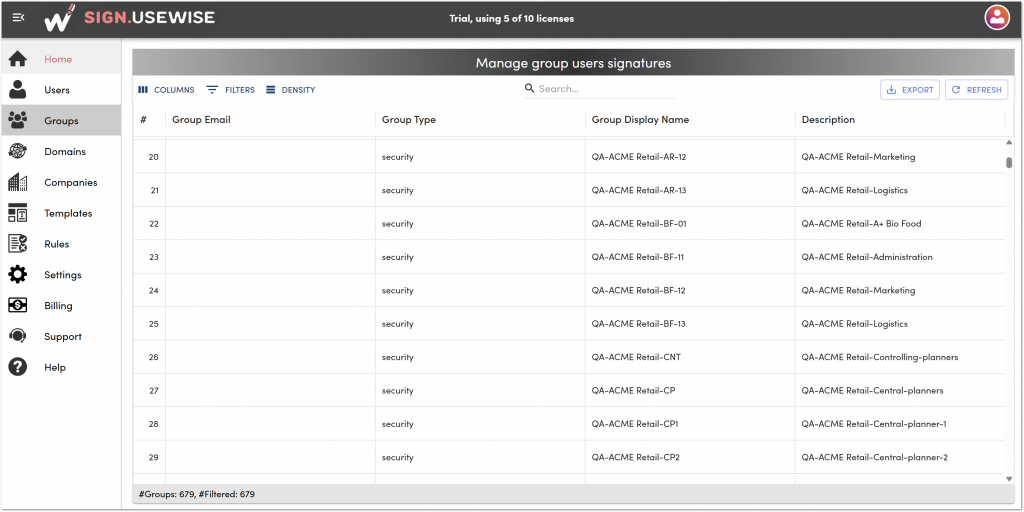
The Groups page provides a full overview of all tenant groups. Use the search bar or top-left filters (ID, name, email) to find specific groups. Export the user list to CSV/Excel, or print to PDF, from the top-right. A Refresh option is available to synchronize group data with Azure AD.
Domains
The domains page provides an overview of all your Microsoft 365 domains on your connected tenant. For each domain, you can see the verification status and also the following information:
- Check if your MX, SPF, DKIM, DMARC, and BIMI records are correctly configured
- Information about the domain registrar
- The expiration date for each domain
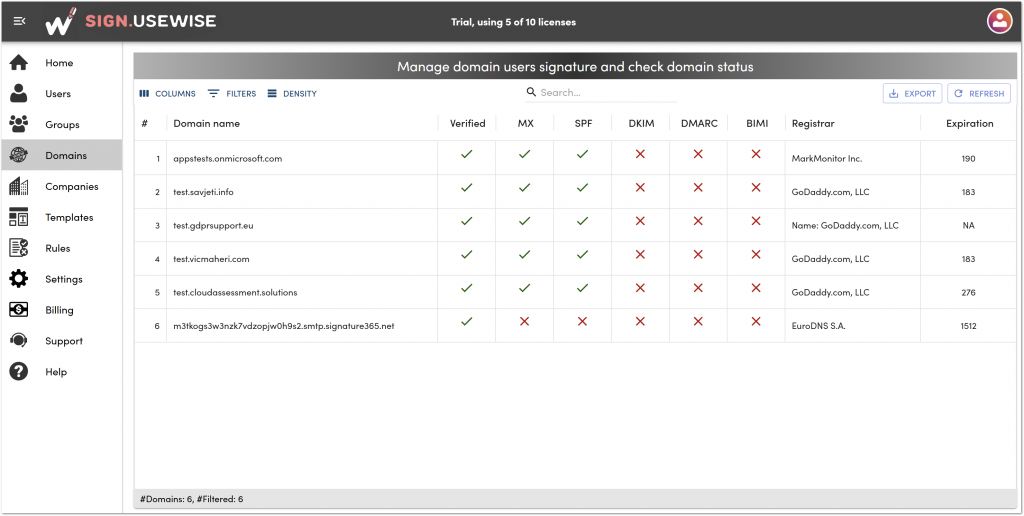
Checking your domain status is a valuable step towards improving your domain reputation. If you have all your records properly set, then the green tick will be displayed under each of these protocols in the Sign.UseWise® app Domains page. If that is not the case, you might encounter various issues, such as your emails ending up in recipients’ spam folders. Here’s a simple explanation of each record:
MX – Mail Exchanger record is a type of DNS (Domain Name System) record that specifies the mail servers responsible for accepting email messages on behalf of a domain name
SPF – Sender Policy Framework defines the mail servers that are allowed to send mail for your domain. It helps to protect your domain against spoofing and prevents outgoing emails from being marked as spam.
DKIM – DomainKeys Identified Mail is used for the authentication of an email that’s being sent. DKIM adds a digital signature to every outgoing mail, which enables receiving servers to verify the email came from your organization.
DMARC – Domain-based Message Authentication, Reporting & Conformance uses SPF and DKIM to determine the authenticity of an email message. With DMARC, you define what to do with messages that dont pass SPF or DKIM (such as to reject the message or quarantine it).
BIMI – Brand Indicators for Message Identification is a standard that associates your brand’s logo with an authenticated piece of email. Learn more about BIMI here.
Companies
When getting started with Sign.UseWise®, your first step is to create a company profile on the Companies page. If your Microsoft 365 tenant has multiple domains, you can set up different company profiles for each. The company details you enter (like name, website, and social media links) will automatically populate templates that include these fields as placeholders.
Depending on a user’s domain, the signature templates they receive will be automatically filled with the data from the matching company profile.
Creating a company profile
To set up your company profile, head to the Companies page. The default profile is automatically created and linked to your primary domain, so you just need to fill in the details. Add your company’s information, include links to your social networks, and upload your logo. For the best display across all email clients, upload your logo at the exact size you need it to appear. Once everything looks good, click “Save” in the top right corner.
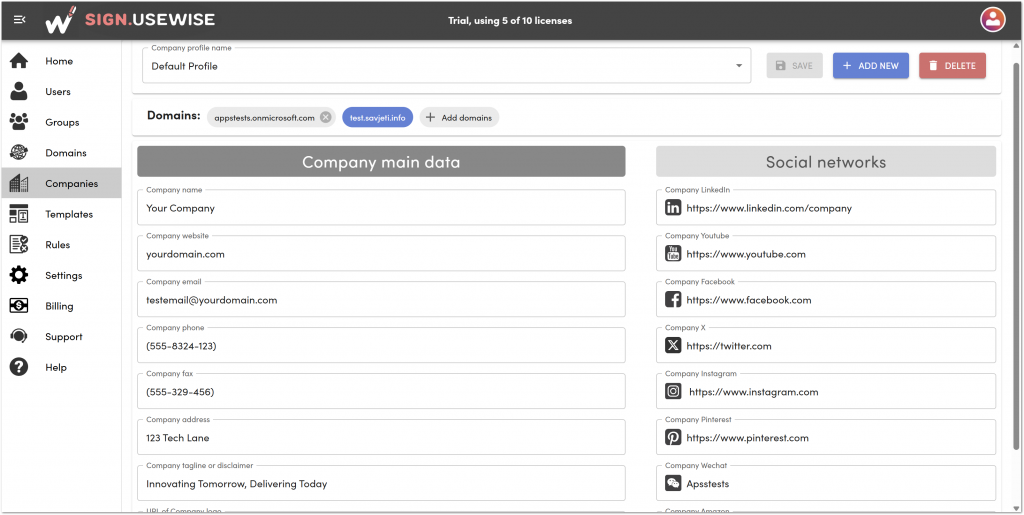
If your Microsoft 365 tenant has multiple domains that should share the same company profile, simply click the “Add domains” button. Select the domains you want to include, then click “Add selected domains“.

However, if these domains represent distinct companies or separate offices within your organization, you can create a unique company profile for each. This allows you to manage their information and branding independently.
To do this, simply click the “Add new” button in the upper right corner. First, give your new company profile a name. In the next step, assign the relevant domain or domains to this company and fill in its specific details. Don’t forget to save your changes when you’re done editing.
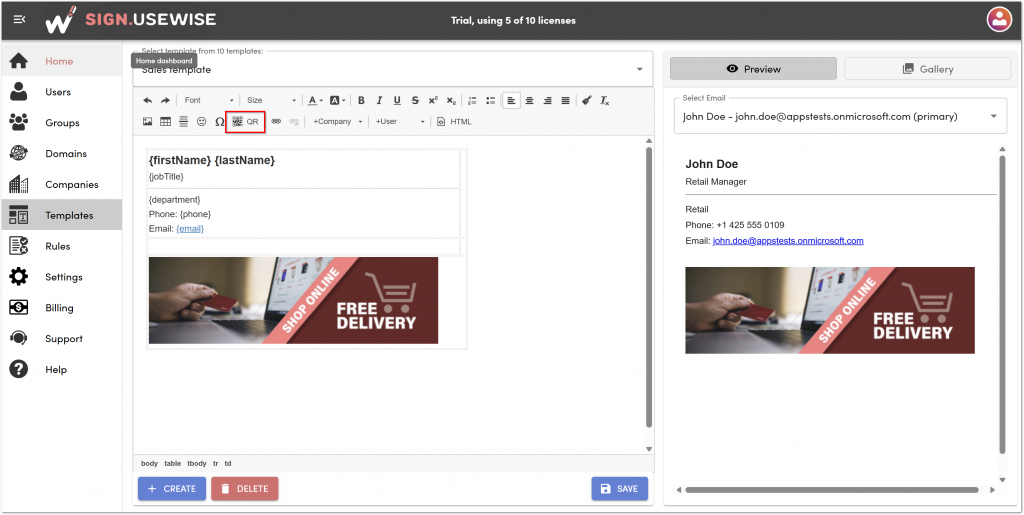
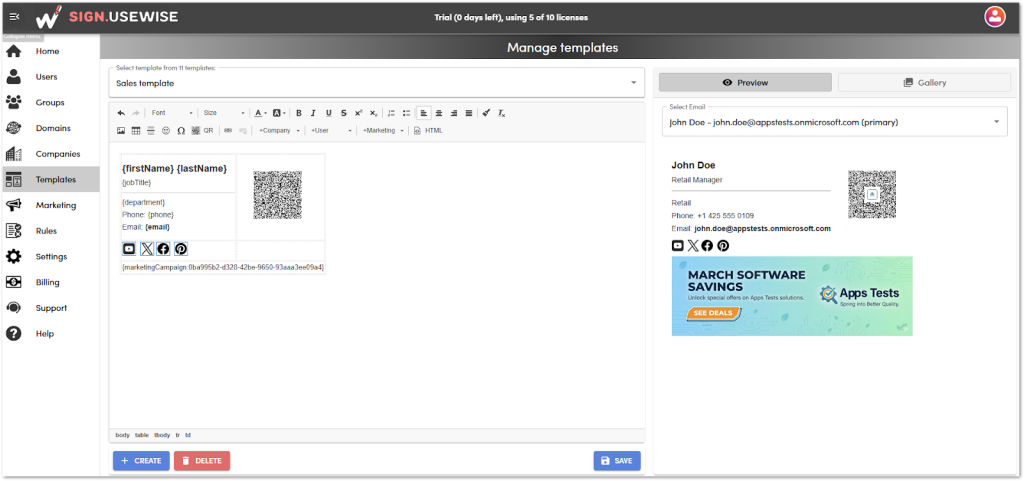
Templates
The Templates page in the Sign.UseWise® app is where you’ll create and manage all templates for your organization. You can create multiple templates and assign them to users, groups, or domains.
With our intuitive WYSIWYG signature editor, you have complete control over your signature’s design. Adjust its appearance using a wide range of formatting options, including font type, size, and color, plus the ability to insert tables and graphics. Hover over any feature to see what it does, then simply add your desired text or visuals to any part of your signature. You can create templates from scratch or start by using templates from the app gallery.
Creating a new blank email signature template
To create a new template from scratch, follow these steps:
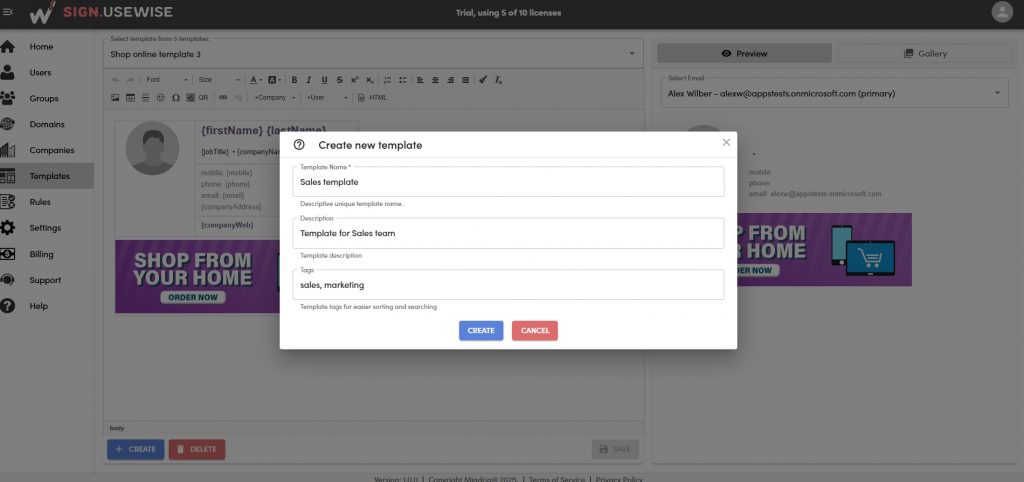
- Go to the Templates page and click on “Create” to start from a new blank template. Give your template a name; optionally, you can add a description and tags. Click “Create“.
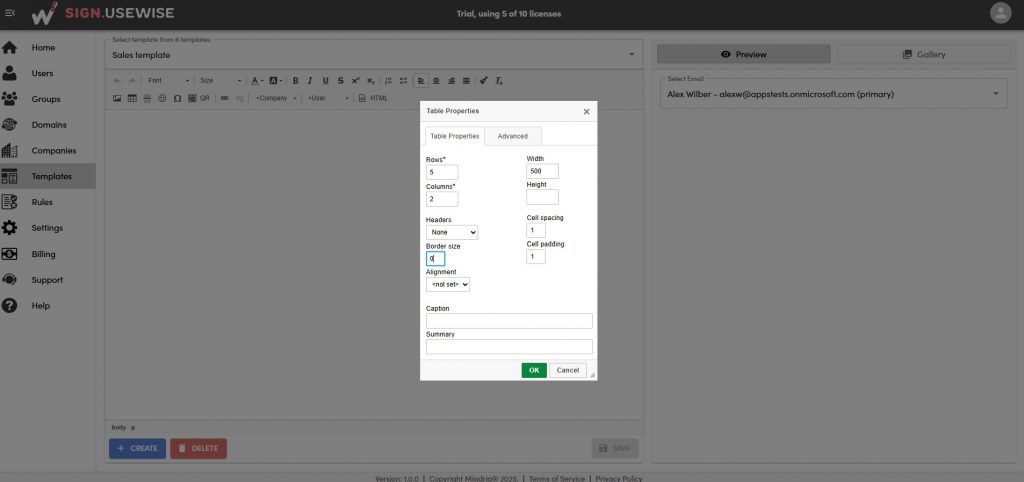
3. We recommend creating a signature within a table so that it stays consistent across different email clients. Simply click the table icon on the toolbar, specify your desired columns and rows (you can always add more later), set the border size to 0 for invisibility, and click “OK“.
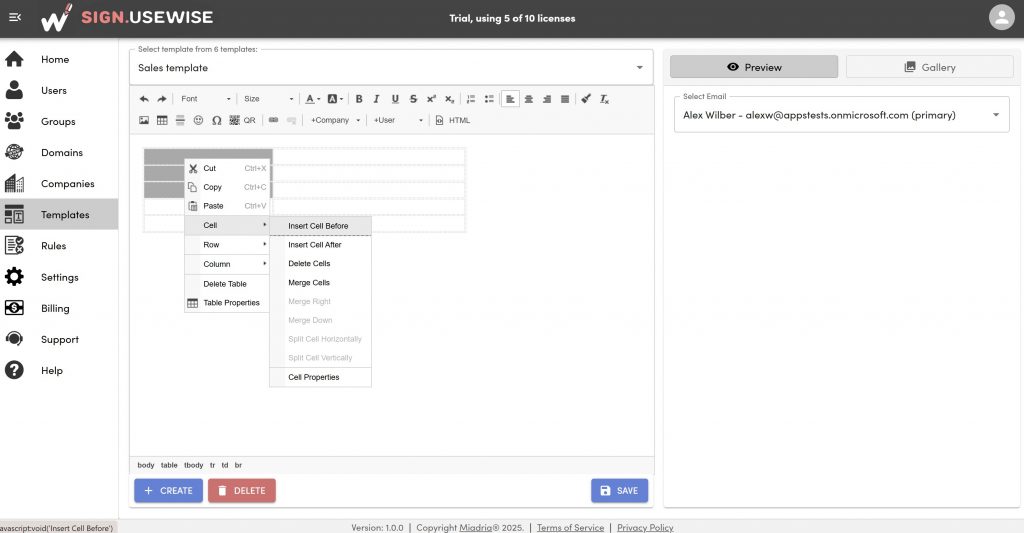
4. You can adjust cell size by right-clicking within the cell and selecting “Cell properties“. To merge cells, highlight them, right-click, and choose “Merge cells“. You can also modify the table’s columns and rows by right-clicking within the table and selecting options to add or delete rows or columns.
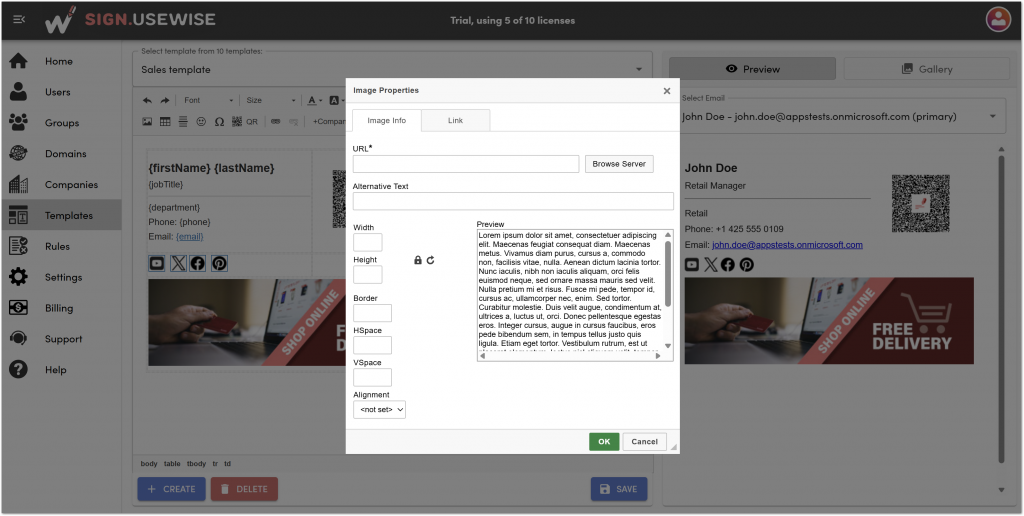
6. User or company data can be added via the User and Company placeholders menus, as well as static text that would be the same for all users. Insert graphics, banners, social media icons, and company logos using the toolbar’s image option.

7. To upload an image, select the image option on the toolbar and click “Browse Server”.
8. Here, you can upload your own images or select from the predefined gallery within Sign.UseWise®. To upload an image, select the “Upload” option, locate the desired file on your computer, and then click “Insert” to add it to your template. To use the predefined images, simply toggle the “Predefined” option and select from the variety of available images
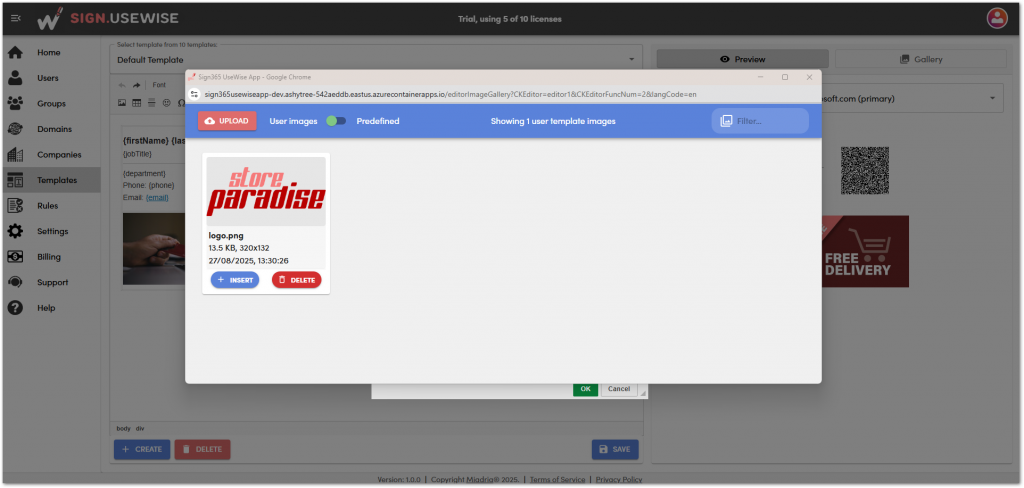
9. Under the Image Properties, you can adjust the width and height of your image, add alternative text for accessibility, or link the image to a specific website.
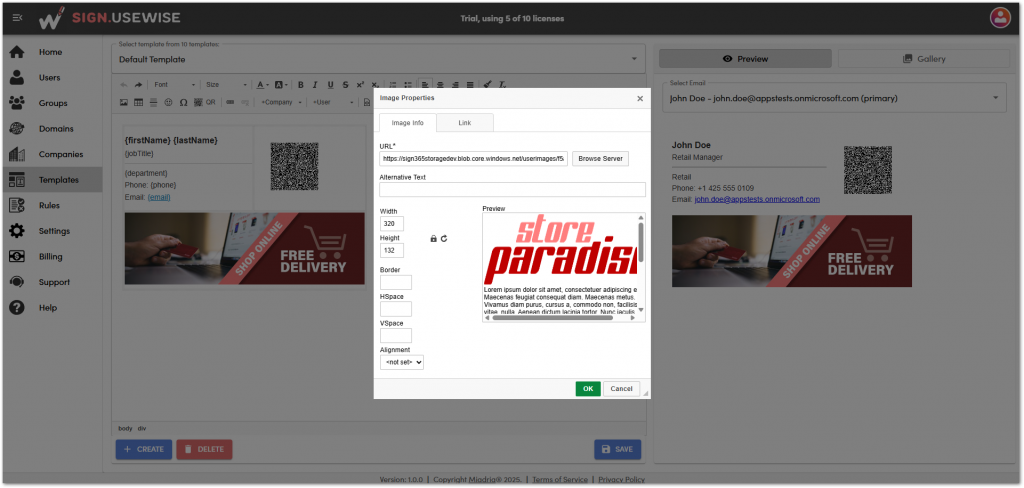
Important: Achieve perfect email signature consistency by uploading graphics in their exact final size. Resizing larger images within the editor is not recommended, as it often results in varied appearances across email clients.
Creating email signatures with templates from the gallery
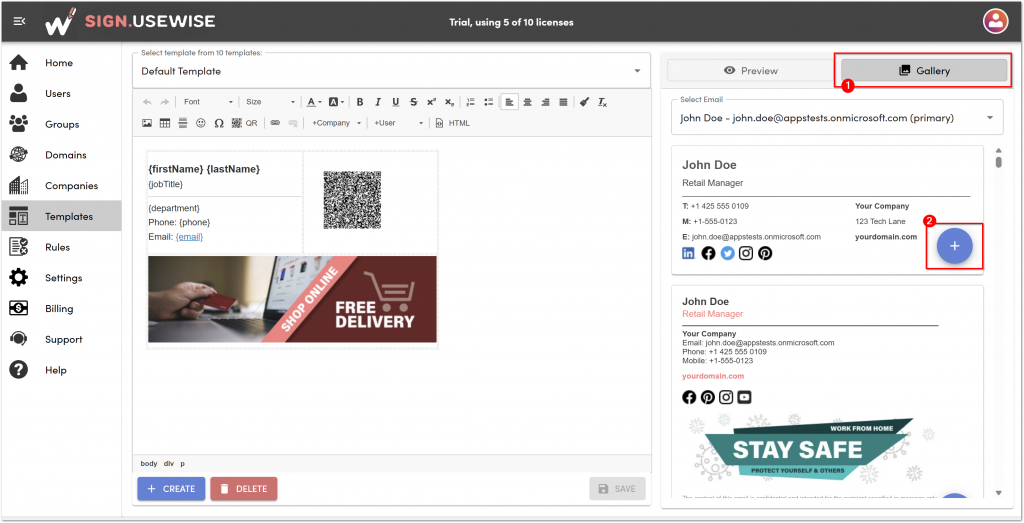
The easiest way to quickly create a template is by using one of the predefined templates from Sign.UseWise® gallery.
- On the templates page, select gallery in the upper right corner to load the templates.
- Select the template you want to use by clicking on the plus icon.
3. Now give your template a name and change the description and tags if necessary. Click Create.
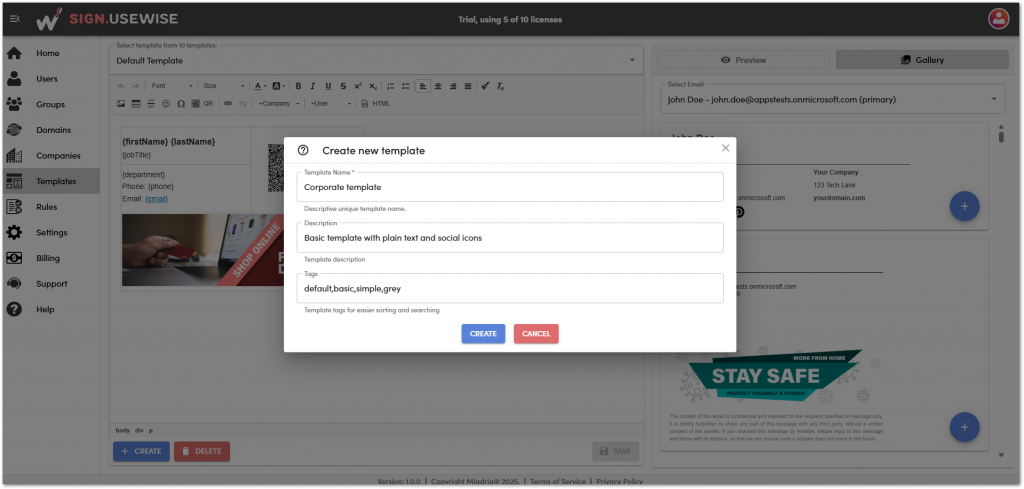
4. You will get a copy of the template in the gallery, which you can customize to fit your company’s needs. Simply click on the cell you’d like to edit and start making changes—adjust text, colors, fonts, or placeholders, and add your own images or other elements. Make sure to save changes when done with editing.
Adding QR codes to email signatures
Sign.UseWise® makes it easy for people to add your contact info via a unique QR code. A vCard is a standard file format for electronic business cards. When you include one, recipients can quickly create a contact entry for you with just a click. When linking it to a QR code, you make your contact details scannable directly from any mobile device.
To add a QR code to your email signature template, follow these steps:
- On the template page, select the template you want to edit and click in the area of the template where you want to place your QR code.
- Click on the QR code option on the toolbar.
3. The dialog box will open, where you can specify which Azure AD user directory fields will be included in the vCard. You can also include the company information (information added to the company profile within the application.)
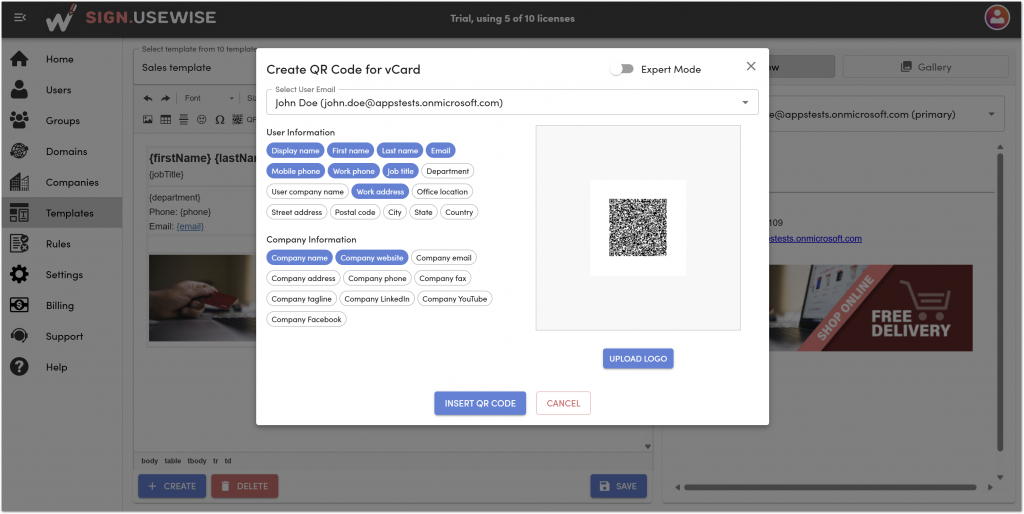
4. To access more QR code settings, toggle the Expert mode. Now you can specify more advanced options such as QR code size, color, dot style, and other settings to fit your brand identity. The error level setting determines how much damage a QR code can withstand and still be scannable, for instance, if it’s printed. For QR codes used solely in email signatures, we suggest setting an error level of 7%.
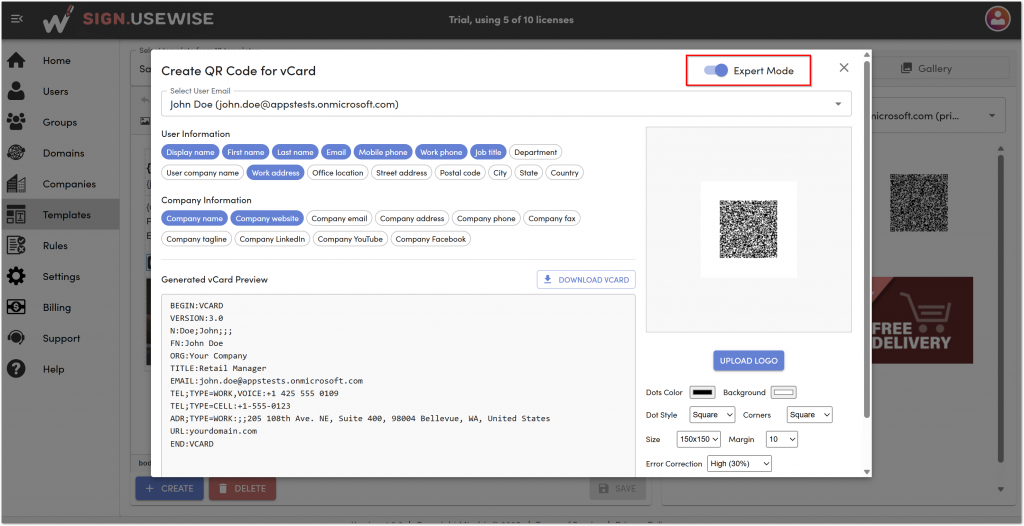
5. Once editing is complete, select Insert QR Code and save your template. Your QR code will be added to the email signature template, and its settings can be adjusted at any time.
Marketing campaigns
With the Sign.UseWise® Marketing planner, you can transform everyday correspondence into a powerful promotional tool. Whether you are highlighting upcoming events, new product launches, or seasonal advertisements, Sign.UseWise® allows you to embed professional banners or any other graphics into every outgoing signature.
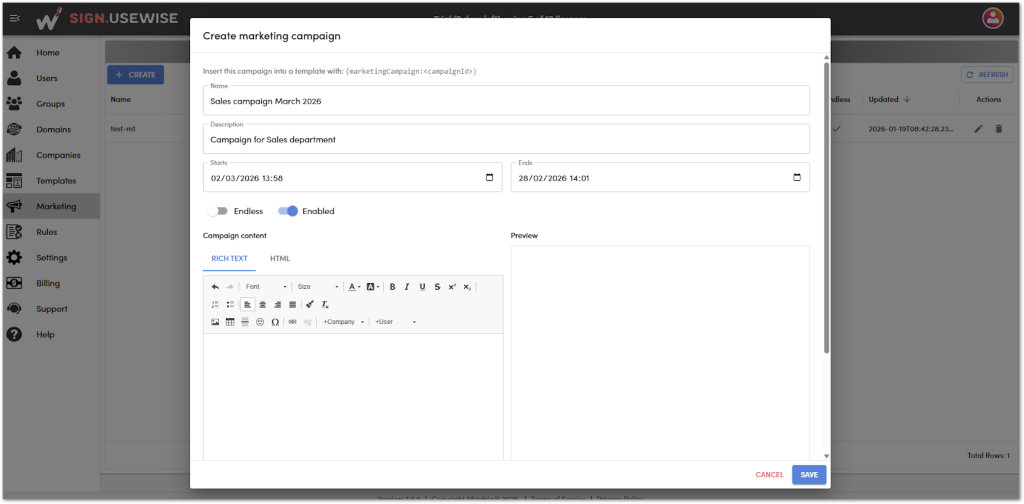
- To get started, navigate to the Marketing page, where you can use the built-in editor to create and manage your campaigns. Click “Create” in the upper left corner.
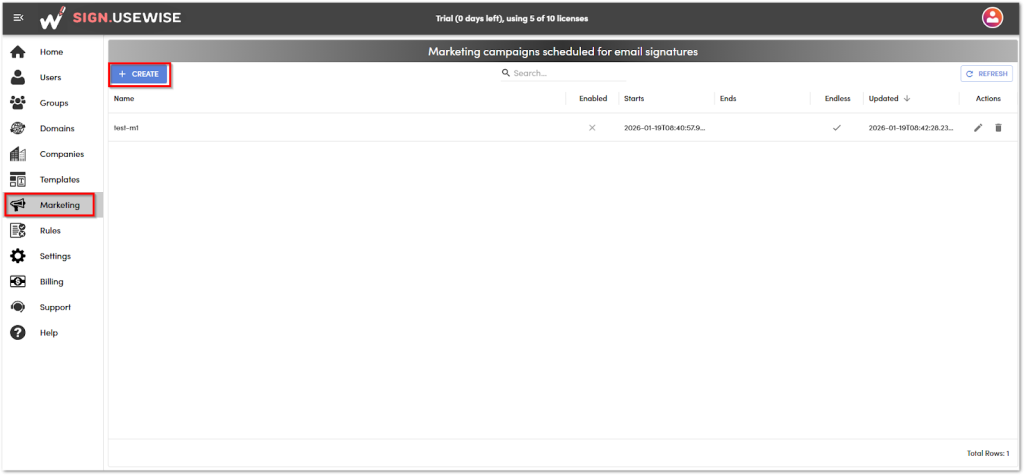
- The dialog will appear where you will input campaign details such as name, description, start date, and end date. If you prefer the campaign to remain active indefinitely, simply toggle the Endless option. Use the Rich Text Editor to build your content – add text, links, or images by selecting the image option on the toolbar.
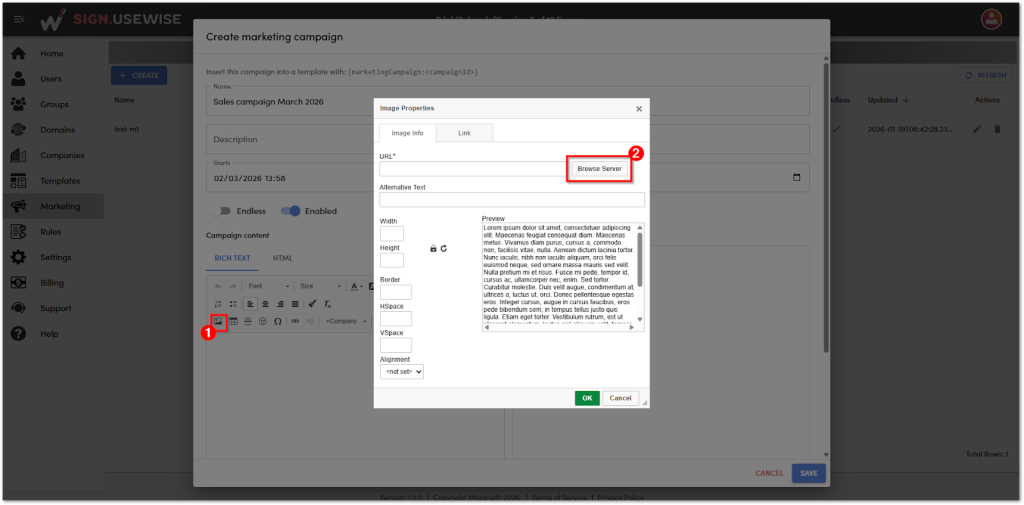
- After clicking the Image icon, select “Browse Server” to open the media management window. From here, you can either upload a new image directly from your computer or toggle the Predefined option to choose from the app’s built-in gallery.
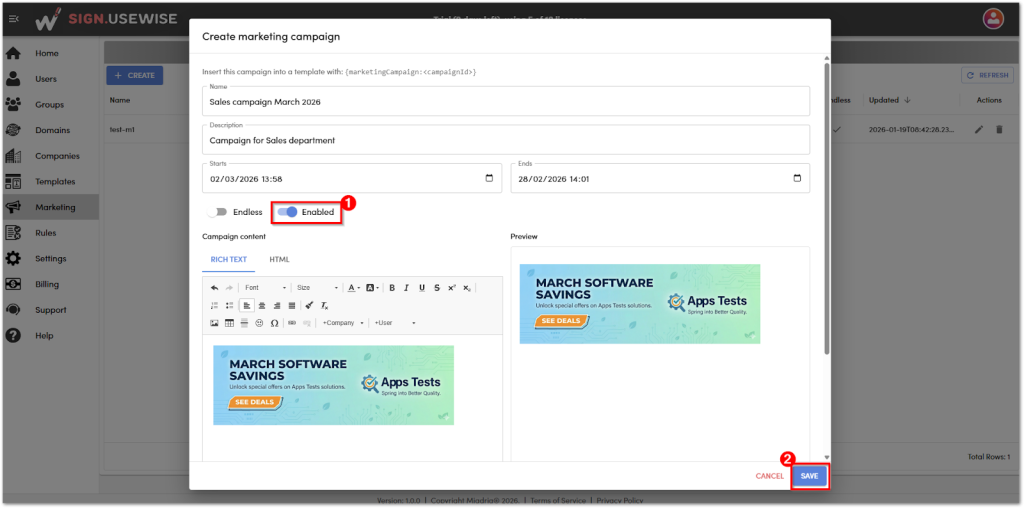
- You can link the image to a specific page; just select the link section and enter the desired URL. Once you have everything in place, enable the campaign and save it.
- To add a campaign to your email signature, you must edit the template first. Navigate to the Templates page, select the desired template, and click the area where you want the banner placed. Next, select ‘Marketing Banner’ from the toolbar and choose the campaign name from the drop-down list to insert the placeholder.
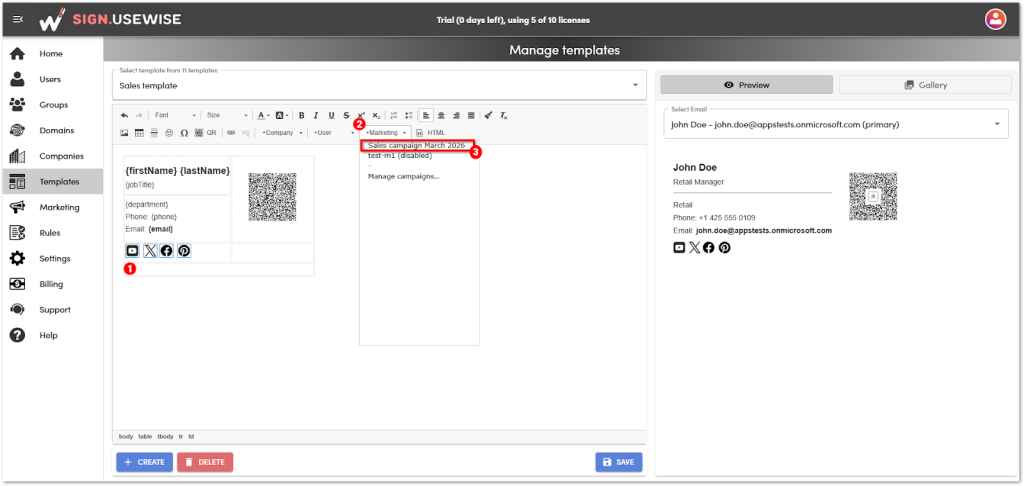
- Once you have inserted the marketing placeholder, you can see how the template looks for a specific user in the preview section of the templates page.
- Make sure to save the template at the bottom of the screen. If it is already assigned, users must restart Outlook to see the updated email signatures. If the template is not yet assigned, please create the appropriate rule on the app’s Rules page.
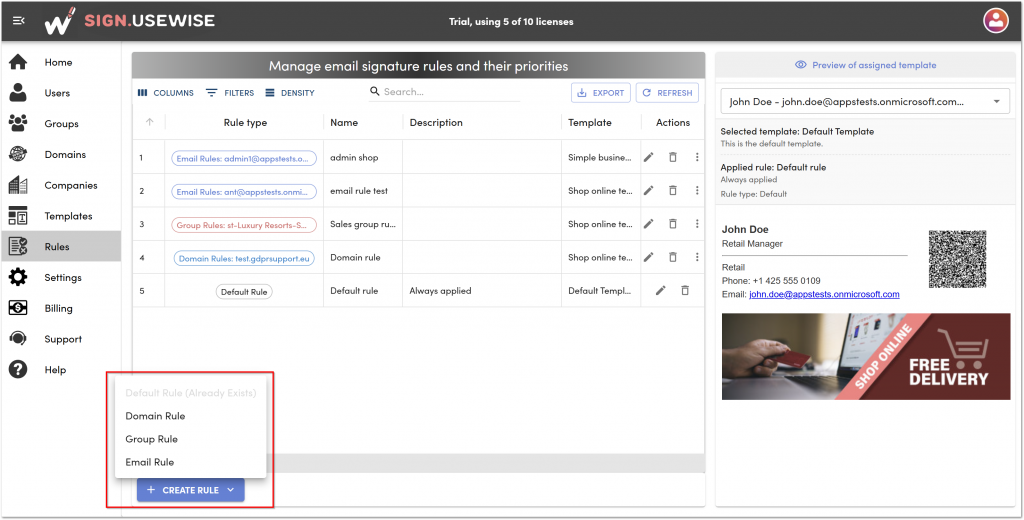
Rules
Signature assignment for users is managed on the Rules page. This section offers several options to specify which users receive which signature template:
- User: Assign a template to a specific user.
- Group: Assign a template to all email addresses within a defined group.
- Domain: Assign a template to all email addresses using a specified domain name.
- Default: Assign a template to every email address within the tenant.

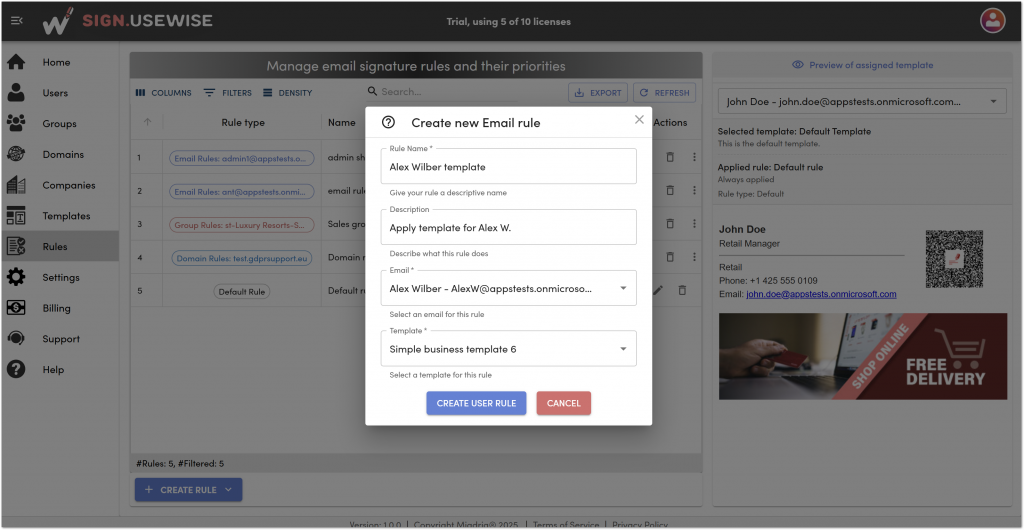
Creating email signature rules
To create a new rule, go to the Rules page and select “Create rule“. Then, choose whether you want to create a domain, group, or user rule.
In the dialog that opens, you’ll first need to name your rule and can optionally provide a description. Following this, select the domain, user, or group for this rule using the dropdown menu. Lastly, choose the template you want to associate with this rule from the final dropdown option. To finish, click the “Create rule” button at the bottom of the dialog.
Rule ordering and priority
Once you create your rule, it will appear in the rules list. You can create multiple rules and arrange them in your preferred processing order by clicking on the three dots under the action menu and selecting one of the options to move up, move to top, or move down and move to bottom.

You can edit a rule by selecting the pencil icon under the Actions menu, or delete it using the delete option in the same menu.
There can be only one rule per the same email address, group, and domain. Rules are applied sequentially, starting with user rules (one per email address). Then, group rules (one per group) are processed, followed by domain rules (one per domain). If a default rule exists, it is always applied as the final step in the process.
On the right side of the pane, you’ll find a preview of the template associated with each email address. Just select a user, and any assigned template will appear automatically.
Application settings
On the Settings menu of Sign.UseWise® app, you can access the following features:
- Addon installation and settings – To set signatures for end users, Sign.UseWise® utilizes a modern Outlook add-in that must be deployed by an administrator.
There is also an option to turn on or off automatic license distribution to new users as they are added to your organization. - Synchronization settings – in this menu, you can schedule the daily synchronization with Microsoft Entra ID (formerly Azure AD). This section also allows you to enable synchronization of user avatars, custom attributes, and additional Exchange attributes (web page, notes, initials, home phone) during each refresh.
- Display settings – you can change the grid density to compact, standard, or comfortable.
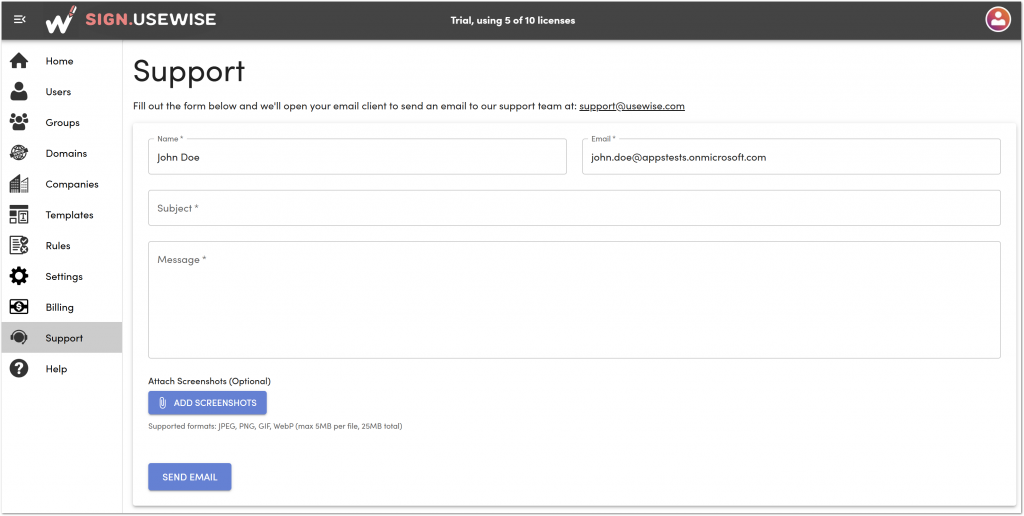
Support
For any assistance with the Sign.UseWise® app, head to the Support menu directly within the application. You can submit a support request, which will be automatically sent to our team. They will contact you via email and provide support as soon as possible.
The support form is already prepopulated with your name and email address. You just need to enter the subject of your query, provide as much detail as possible, add screenshots if necessary, and then click ‘Send email‘.