To start using Sign.UseWise® all you need is a Google Workspace subscription and an Internet-enabled workstation with one of the modern web browsers to get started. We highly recommend using Google Chrome browser, but any other will work as well such as Mozilla Firefox, Microsoft Edge or Opera.
Deploying Sign.UseWise® from Google Workspace Marketplace
Sign.UseWise® can be deployed only by Google Workspace super admins. In case you are logged into multiple Gmail accounts within the same browser, make sure you are logged into a super admin account that is added to a separate browser profile (or log in using an incognito window) so that you avoid possible cookies issues that may arise if you are logged into multiple Gmail accounts at once. If you are not sure how to create, for example, a Chrome profile, explore this video. The procedure is pretty much the same for other browsers.
To deploy Sign.UseWise® app from Google Workspace Marketplace, follow these steps:
1. Go to Google Workspace Marketplace and select Sign in in the upper right corner and log in with your admin account.
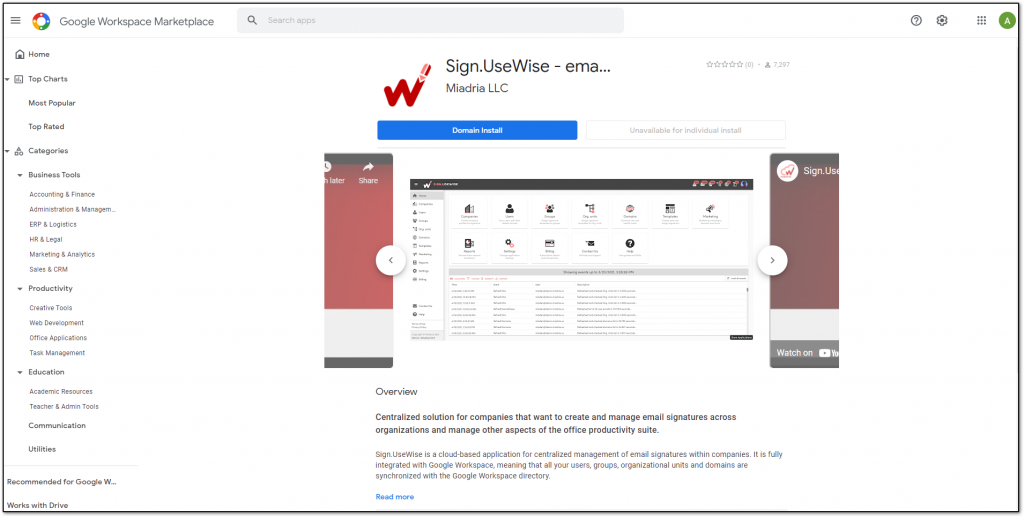
2. After successfully logging into your Google Workspace account as superadmin, type Sign.UseWise® in the search bar, select it and click on Admininstall below the app name. Next, click Continue to follow the app deployment process.
The Admin install option will be greyed out if you are not signed as an administrator. In that case, you will have to ask your Google Workspace administrator for help.
Sign.UseWise® Marketplace listing
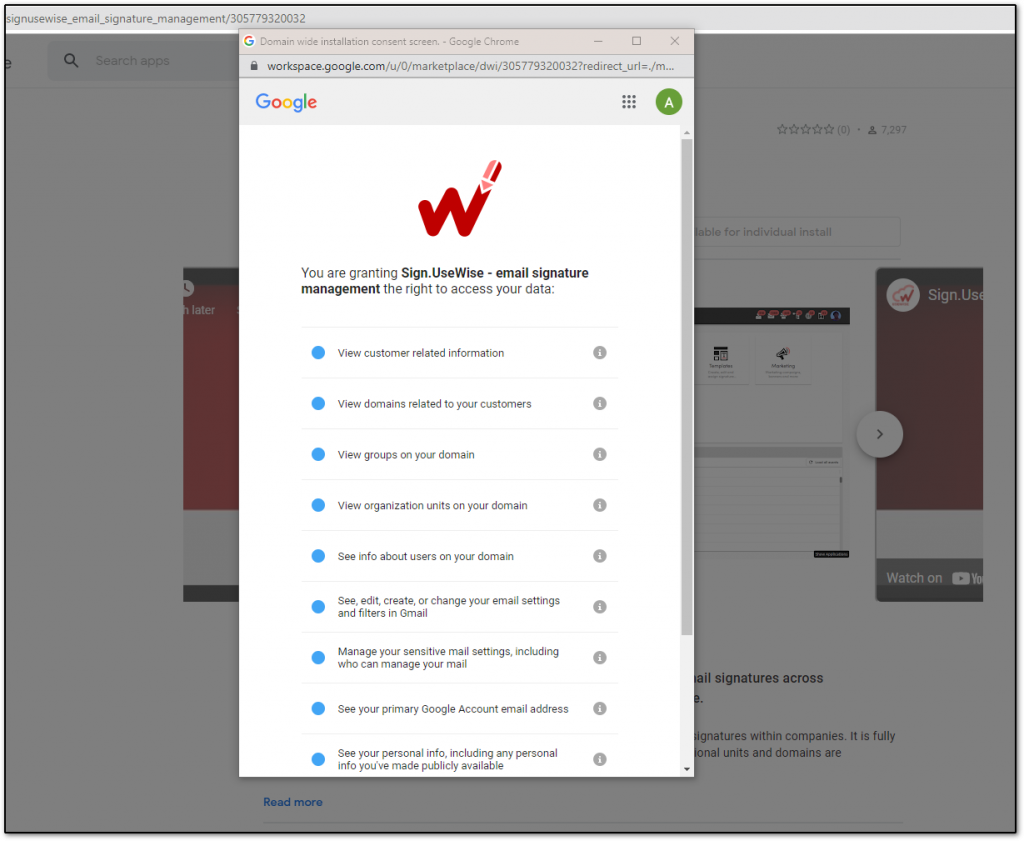
3. Next, the window with scopes will open. After you read them, make sure you tick the field next to “I agree…” and then click Allow.
Marketplace deployment
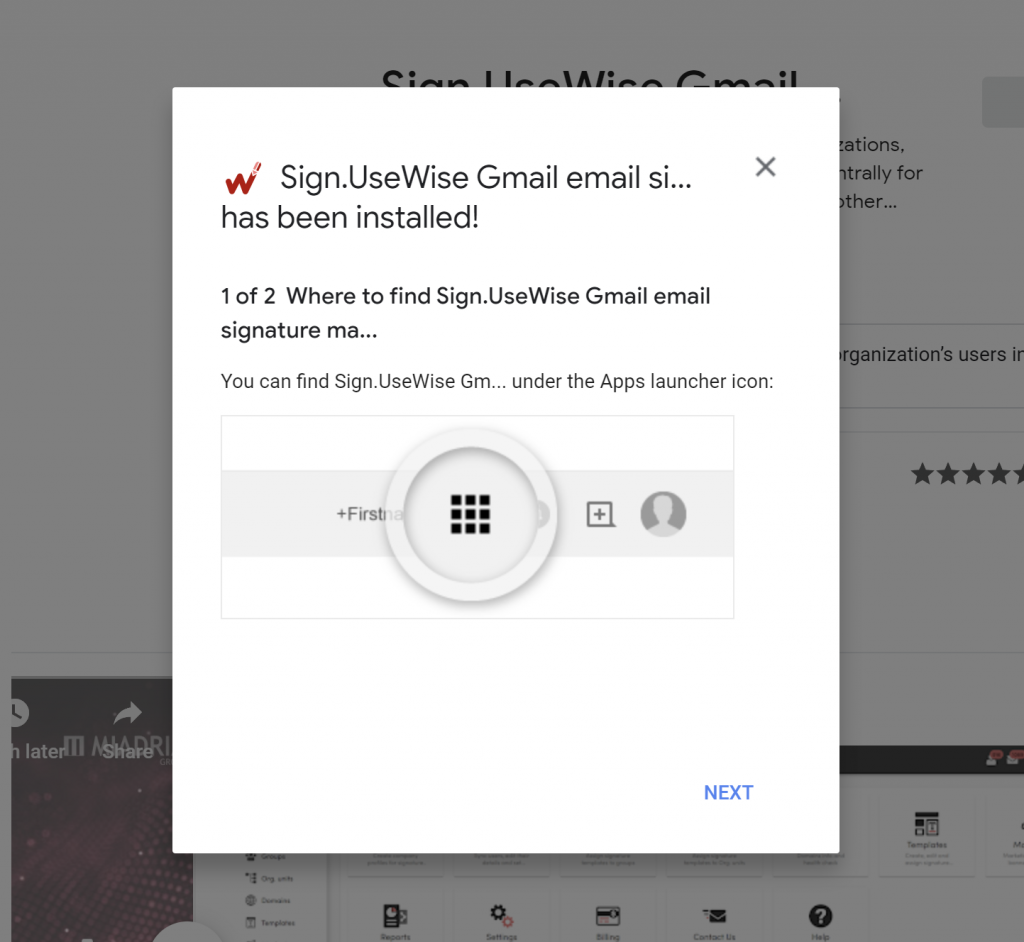
4. The following window shows you how to access Sign.UseWise® from Google Workspace using the Google Apps shortcut. Select Next.
Marketplace deployment
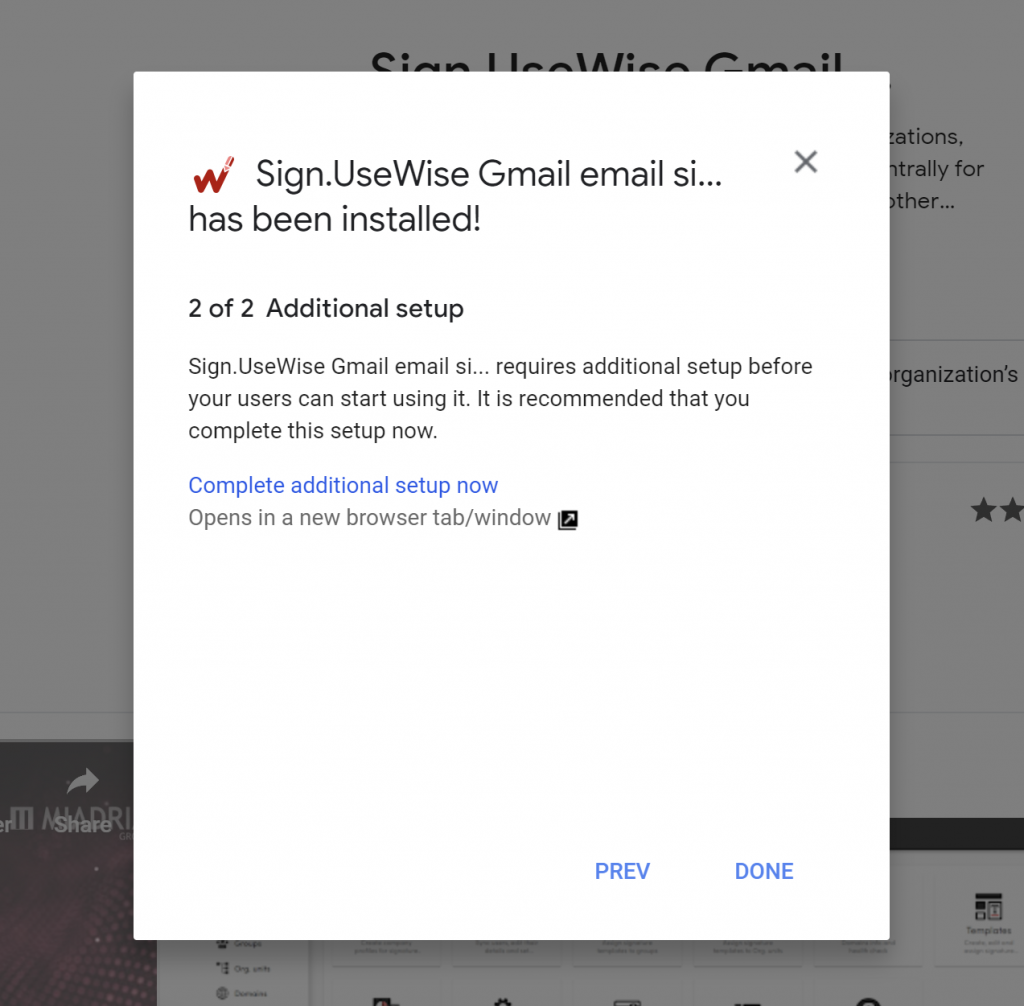
5. If the additional setup step is not displayed, select the domain install button again. Next, select Complete additional setup now. You need to log into Sign.UseWise® to start the initialization of your account. After the first login, there will be a notification in the upper bar that the setup is in progress. (If the additional setup step is not displayed, select the domain install button again.)
Marketplace deployment
Once the initial setup is done, your Google Workspace directory will fully synchronize with Sign.UseWise®.
Deploying Sign.UseWise® for specific groups or OUs
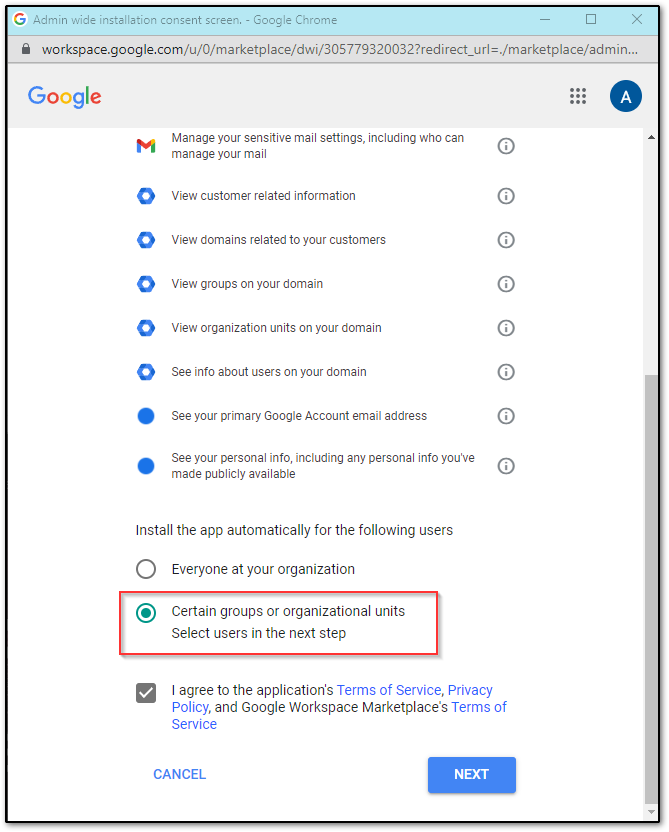
You can deploy Sign.UseWise® only for a subset of the users within the company. Learn more about this new option in the dedicated Google support article. During the deployment process, when the window with the scopes is opened, you can choose Organizational units or groups of people for which you want to deploy the app. You can also place a Sign.UseWise® users into a special Organizational unit or group in Google Workspace and then deploy Sign.UseWise® just for them. Important: Google Workspace admin must be a member of thegroup or OU for which the solution is being deployed.
To deploy Sign.UseWise® for specific groups or OU follow the steps below or check the how-to video on our YouTube channel:
1. Before accepting the Terms and conditions, select the option “Certain groups or organizational units”.
Deploying the app for specific groups or OUs
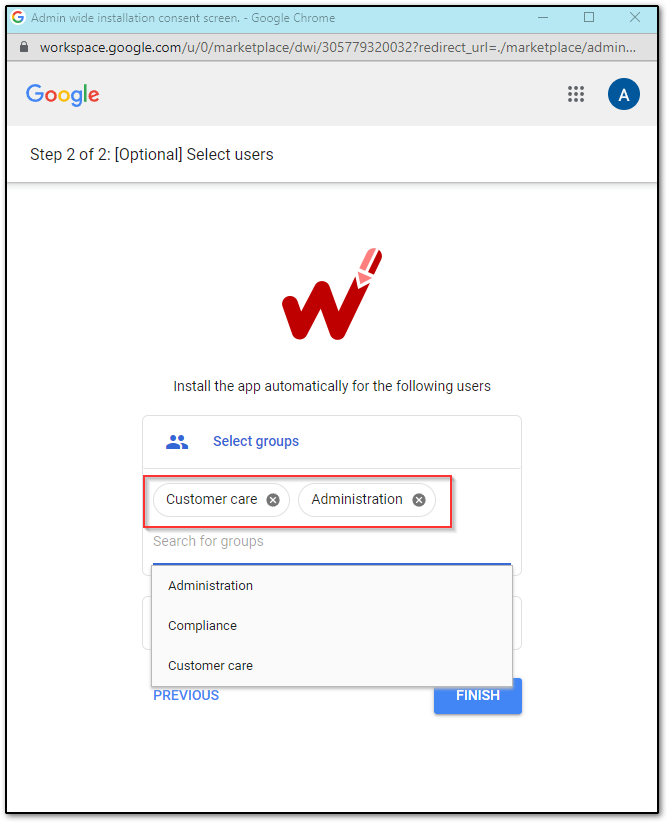
2. In the next step, choose the groups or Organizational units for which you want to deploy Sign.UseWise® app.
3. After you select groups or OUs, click Finish to continue with the deployment. In case you want to add more groups or OUs after you deploy the app, you can easily do it from the Google Workspace admin console.
Managing Sign.UseWise® app distribution in Google Workspace
To manage how Sign.UseWise® is deployed across your organization, follow these steps within your Google Admin Console:
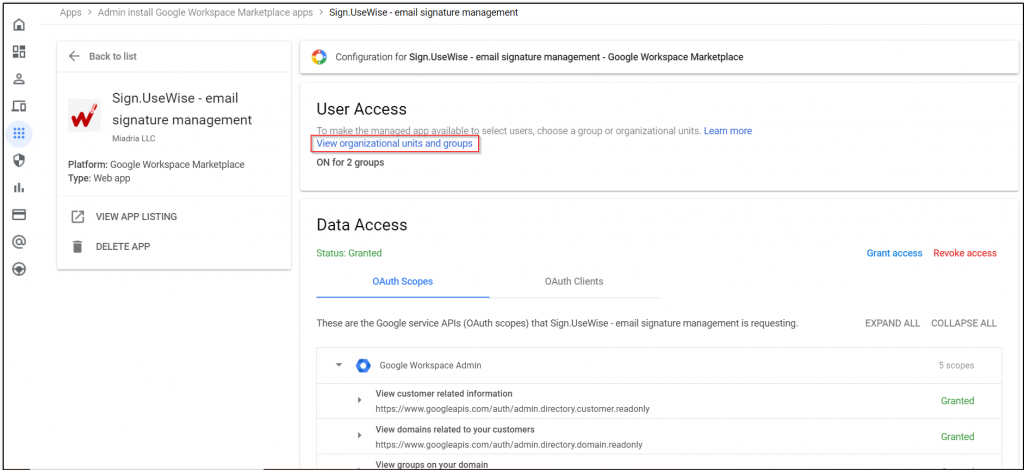
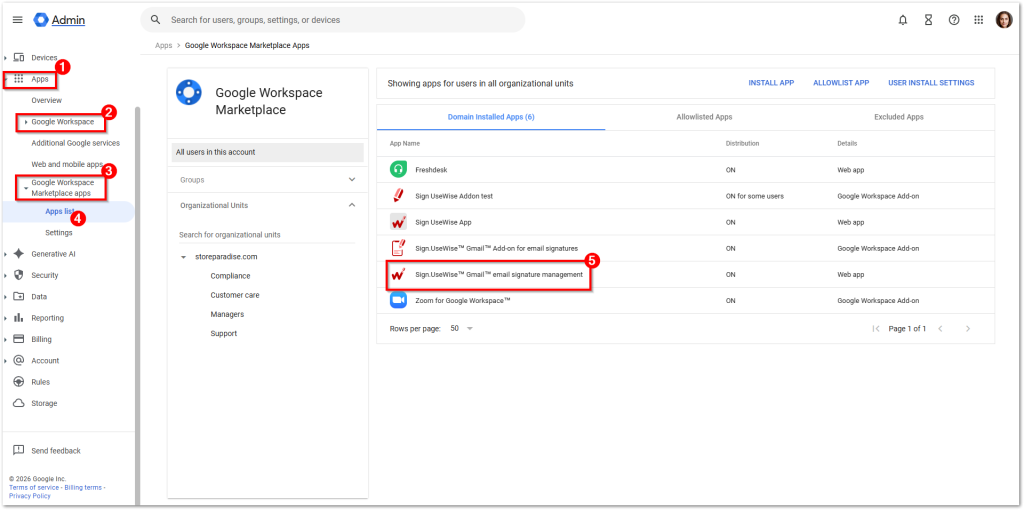
Navigate to Apps > Google Workspace Marketplace apps > Apps list.
Select Sign.UseWise® Email Signature Management from your list of apps.
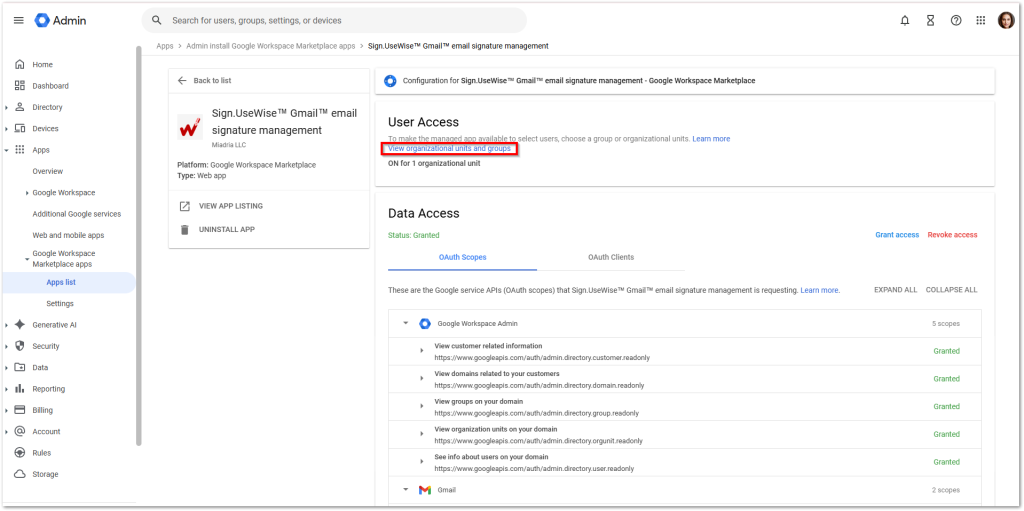
Under the User Access section, click View organizational units and groups.
Configure Deployment Scope
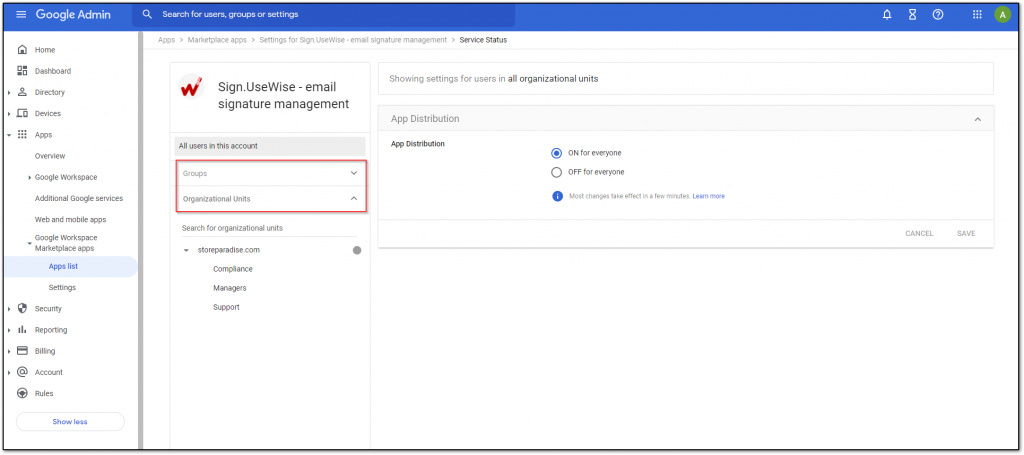
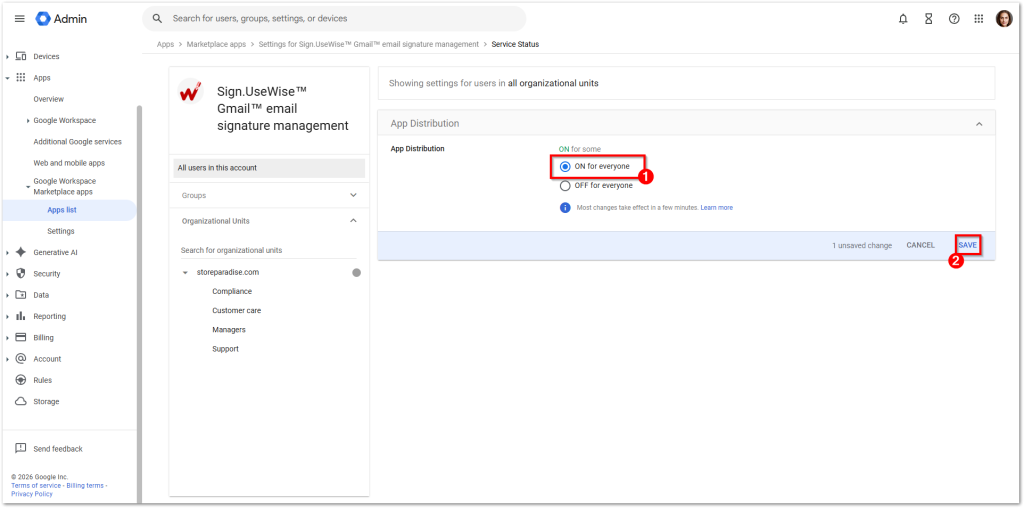
You can choose to enable the app for your entire domain, specific groups, or specific Organizational Units (OUs).
For the entire company: Set the status to ON for everyone.
For specific users only: If the app is currently “ON for everyone,” you must first turn it OFF for the top-level domain. You can then enable it for specific Groups or OUs using the instructions below.
Important note: To maintain administrative access, ensure you are a member of at least one Group or Organizational Unit (OU) where the app is enabled.
Enabling for Specific Groups or OUs
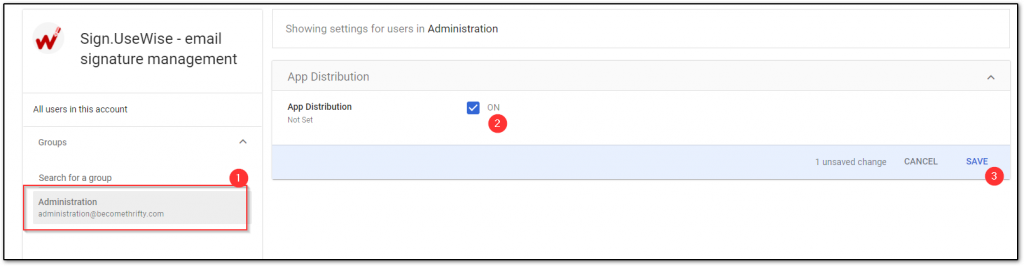
To enable for Groups:
On the left sidebar, click Groups and search for your desired group.
Check the ON box and click Save.
Repeat for any additional groups.
Enabling the app for a specific group
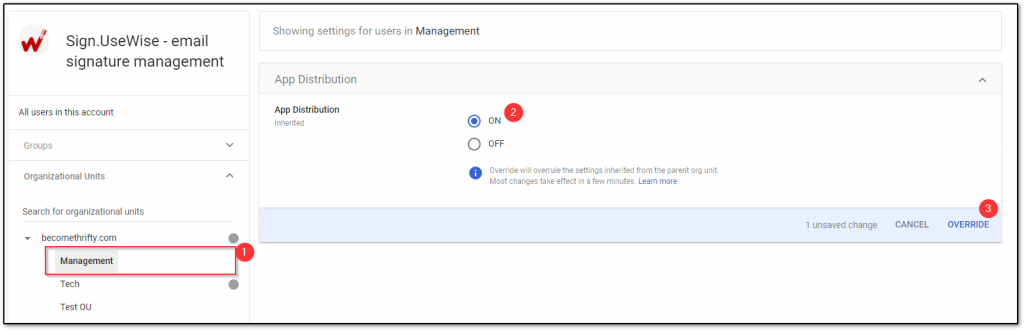
To enable for Organizational Units (OUs):
On the left sidebar, click Organizational units and select the target OU.
Select ON.
Click Override to ensure this setting remains active even if the parent OU settings change.
If “Overridden” is already set, click Save to apply changes or Inherit to revert to the parent setting.
Enabling the app for a specific OU
Sync Changes to Sign.UseWise®
Once you have updated the permissions in Google:
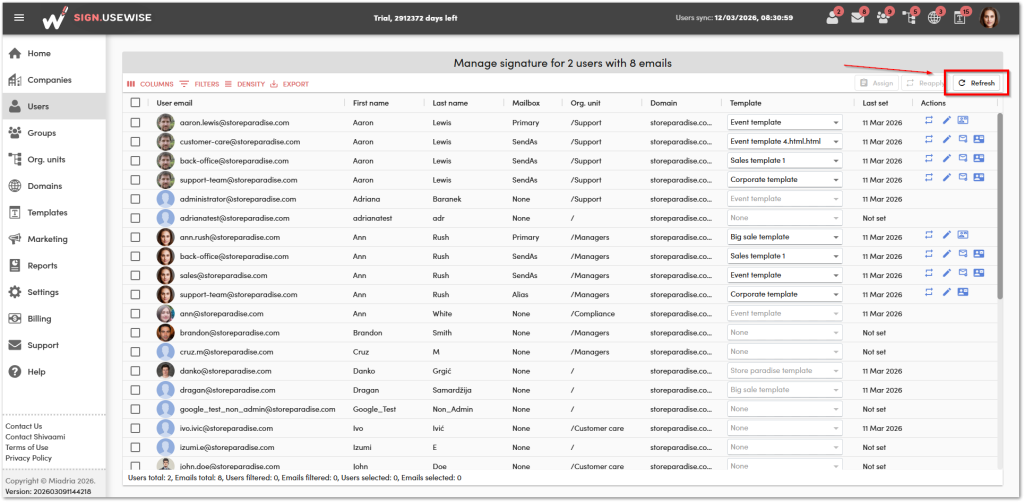
Return to the Sign.UseWise® app.
Navigate to the Users page.
Click Refresh to sync the new deployment status.
Repeat the step on the Groups, organizational units and domains page.
What to expect: You will still see all your Google Workspace groups/OUs listed in Sign.UseWise®, but you will only be able to assign signatures to the specific groups or OUs you authorized during this deployment.
Installing Sign.UseWise® app for additional users
If you initially started your trial or subscription by deploying Sign.UseWise® to a specific subset of users, follow the steps below to expand the installation to additional users or entire organization:
Go to the Google Workspace admin console and log in with your super administrator account.
Navigate to Apps > Google Workspace Marketplace apps > Apps list and find and select Sign.UseWise® app from the list.
2. On the next page, under User access, click on View organizational units and groups.
This will open the page where you can see how the app is distributed in your organization. If the app is installed just for a specific group or Organizational unit, the status will be “On for some”. To change that and install it for everyone, simply select “On for everyone” and click Save. If you want to install the app for additional groups or organizational units folow these steps.
Finally, return to the Sign.UseWise® dashboard and refresh the Users, Groups, and Organizational Units page to sync the latest changes from Google Workspace.
To get you set up and running with Sign.UseWise®, we prepared a detailed overview of the app and how-to instructions which will help you easily create and deploy your Google Workspace signatures and do so much more using Sign.UseWise®.
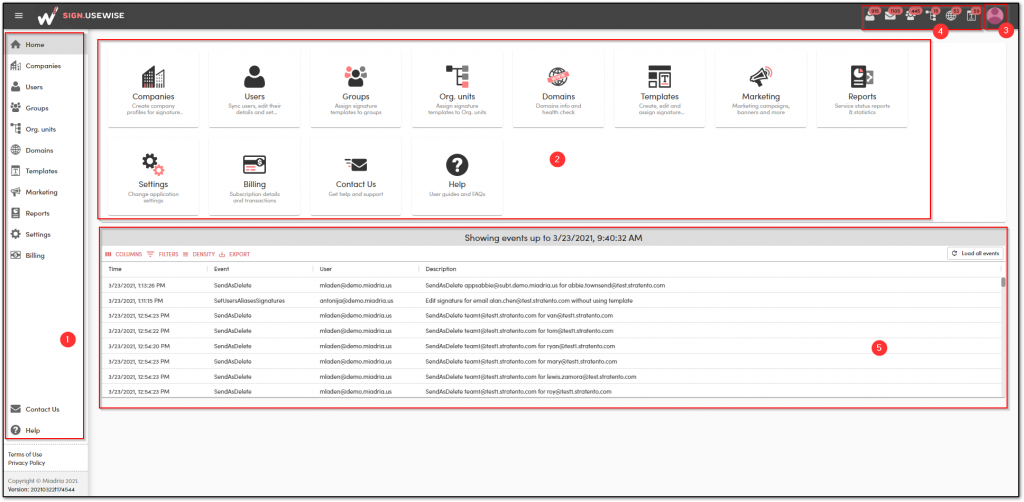
After logging in to Sign.UseWise®, the administrator will be automatically transferred to the app Home page. The home page is a starting point from where you are able to access all pages and get information about the status of your service.
Sign.UseWise® home page
1. From the sidebar you have direct access to key features of the app, such as users, groups, organizational units or domains.
2. Key features are also displayed on the main pane but with a larger preview and short description of every page to help you easily find what you are looking for.
3. Access your profile information and account settings on the top bar.
4. The status bar next to the profile indicates the number of users, number of primary and Send As addresses, groups, organizational units, domains, and templates. Clicking on each of them navigates you to a certain page with more information.
5. Events log table shows a list of all activity that has taken place in Sign.UseWise®.
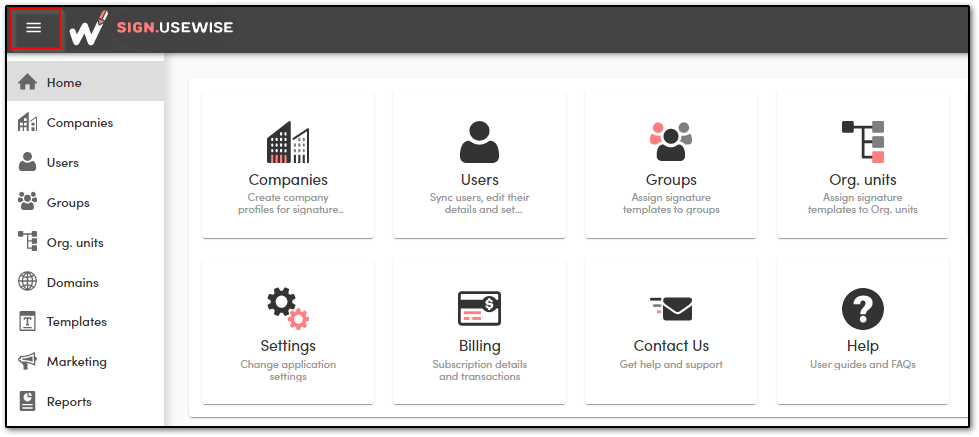
You can expand or collapse the sidebar if you want more room in your browser window by clicking on the three-column button at the top of the sidebar.
The best way to get started with Sign.UseWise® is to fill in your company information such as company web, phone or address, which will then be used in your email signatures.
If you have more companies in your Google Workspace account, you can create multiple company profiles and assign them to one or more domains that the company owns.
This is very useful when working with more than one company, and each of them has different profiles, different branding, and therefore a need for different signature setups.
Creating and managing company profiles
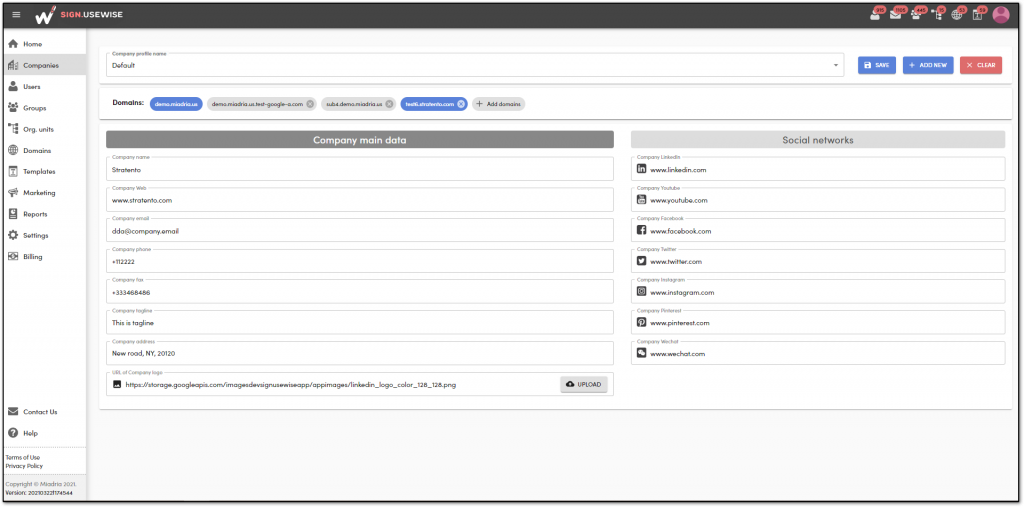
1. After logging into the Sign.UseWise® app, go to the Companies page. The default company profile is already created and connected to your primary domain, so you just need to fill in the fields with company data and click Save in the upper right corner.
Companies page
2. To create a new company profile, click on Add new in the upper right corner and enter a new company profile name in the dialogue box. Click Create new profile and select the domain that will be connected to that company profile by clicking on Add domains.
Connecting domains with company profiles
3. Continue to populate the form with necessary data, which will then be utilized in your signature templates.
4. Add links to corporate social media profiles such as LinkedIn, Twitter, Facebook, Instagram, Pinterest, WeChat, or YouTube.
5. Select Upload logo to upload your company logo, which will also be used in email signatures. Note that uploaded images shouldn’t be larger than 256 KB.
All created company profiles are visible on the Company profile name drop-down list. To change company profile details, select company profile from the drop-down list, change the desired fields and click Save when done. If you want to delete a certain company profile, select it and click on Delete.
Company profiles
Assigning company profiles to domains
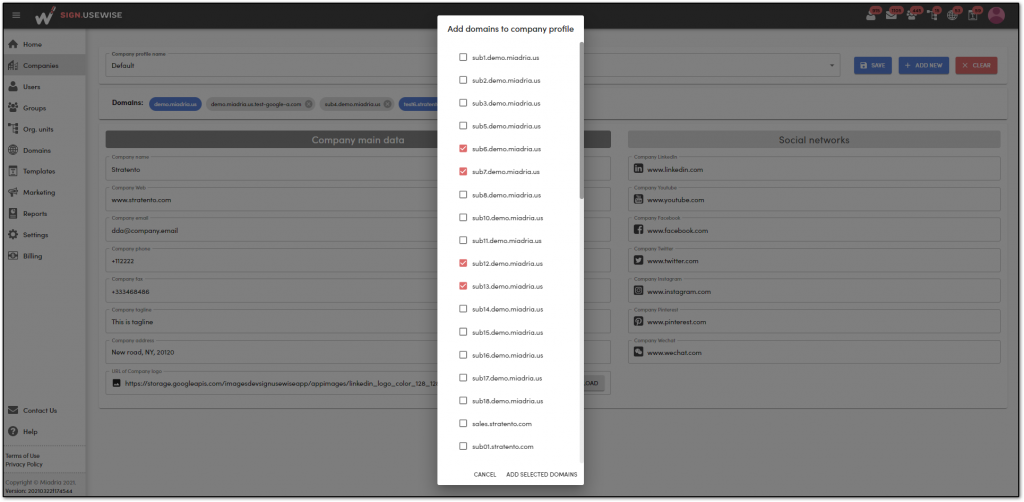
For every company profile created, it is possible to select domains that you want to connect to that profile. For example, if a company owns multiple domains and wants to assign a company profile to only one or more domains, it is possible by selecting them on the companies page, right below the company profile name.
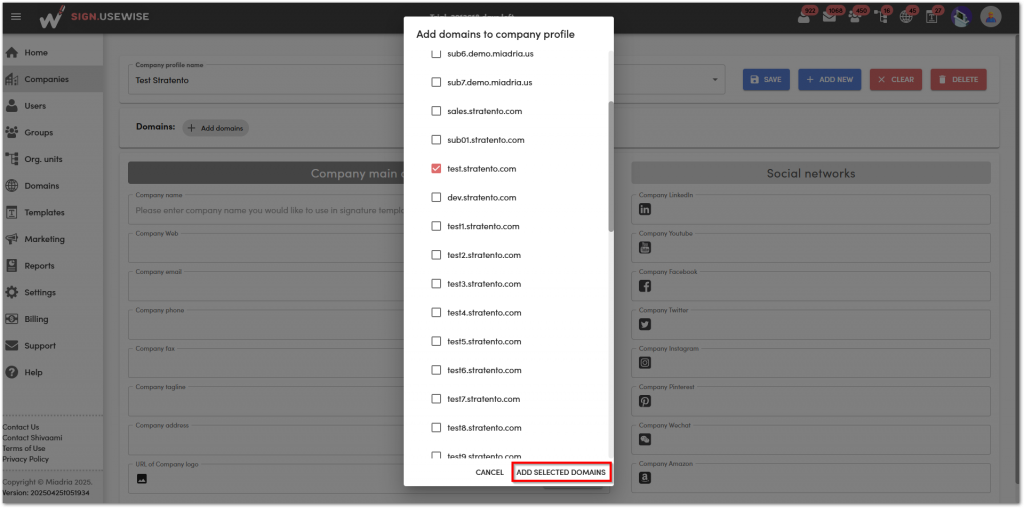
To add more domains, select the Add domains button.
Adding domains to Company profile
Choose one or more domains from the drop-down list. Next, click on Add selected domains and Save in the upper right corner. Select Save profile to save changes to the company profile.
Adding domains to Company profile
To remove a domain, simply click on the x next to the domain name and save changes.
On the users page, administrators can set and edit signatures for users’ primary or alias Send As addresses. All user data is imported from the Google Workspace, including the user profile photo. A special feature of Sign.UseWise® is setting and managing Send As addresses for user aliases, which will be explained in the following sections.
Users page
The information available for each email address in the user table:
User profile photo and primary email address
Mailbox – primary or Send As
Organizational unit
Domain
Template – the template assigned to the email address
Last set – time and date the signature was set
Actions – reapply template, edit signature and manage Send As (create, delete or make default)
Bulk actions
Assign template – assign a template to selected users
Reapply template – reapply the current template to selected users
Refresh – load changes from Google Workspace
Setting signatures for users
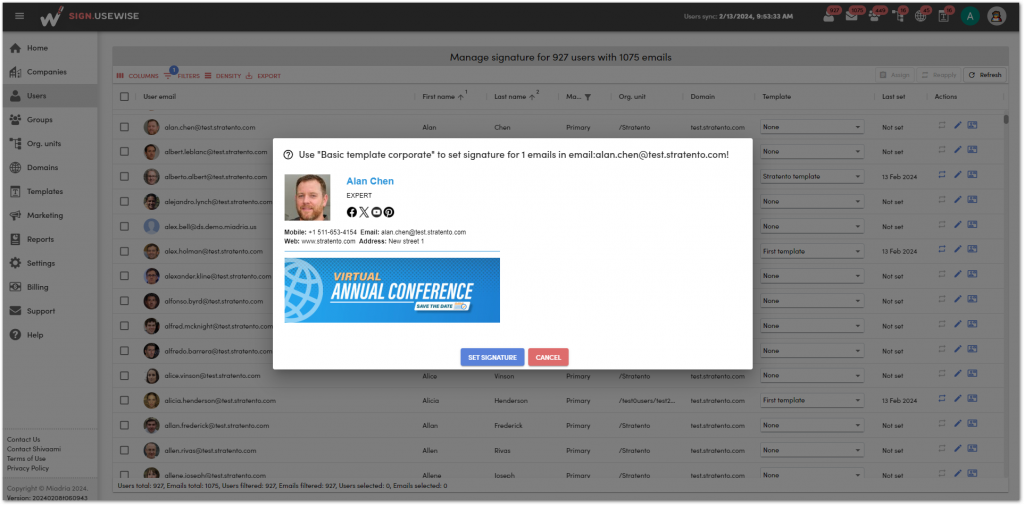
On the users page, you can assign signatures to single or multiple users at once, without affecting the signature settings for other users.
To assign a signature template to the user, simply select the user and choose the template from the Template column drop-down list. Click on the Set signature to complete the action.
Setting signature for user
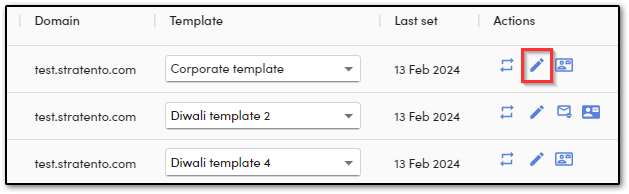
You can also edit the template for a single user by clicking on the Edit signature option under the actions.
Edit signature option
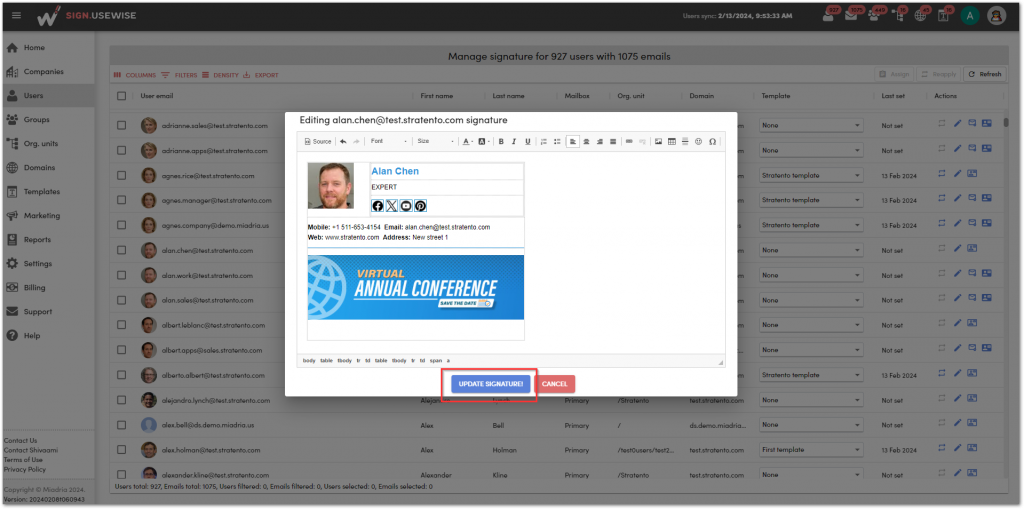
You will be presented with a smaller preview of the signature editor, where you can make the necessary modifications and select Update signature when done.
Editing signature for single user
In that way, you have changed the template for that user only. Since you made modifications to the template on a single-user level, the template name will be changed to None. If a user doesn’t have a signature assigned, the status in the template column will also be None.
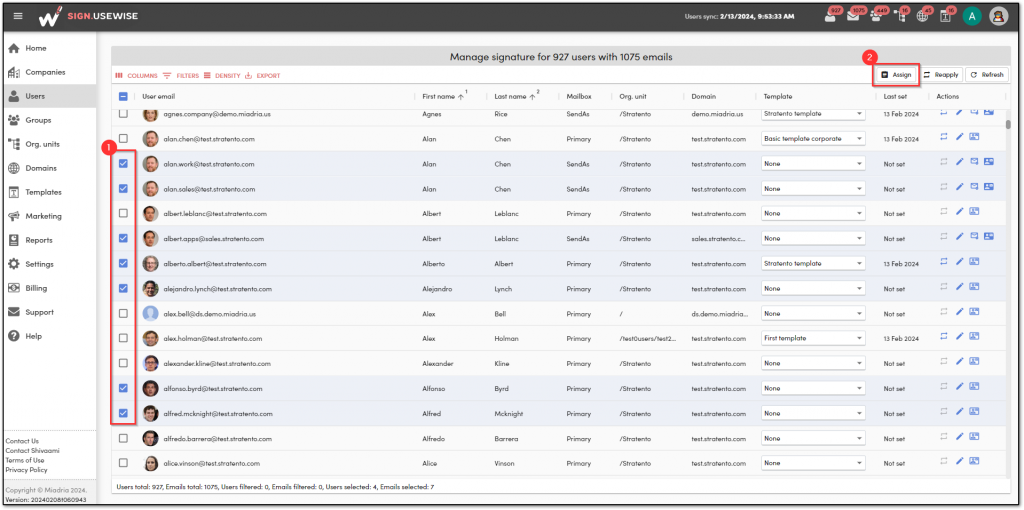
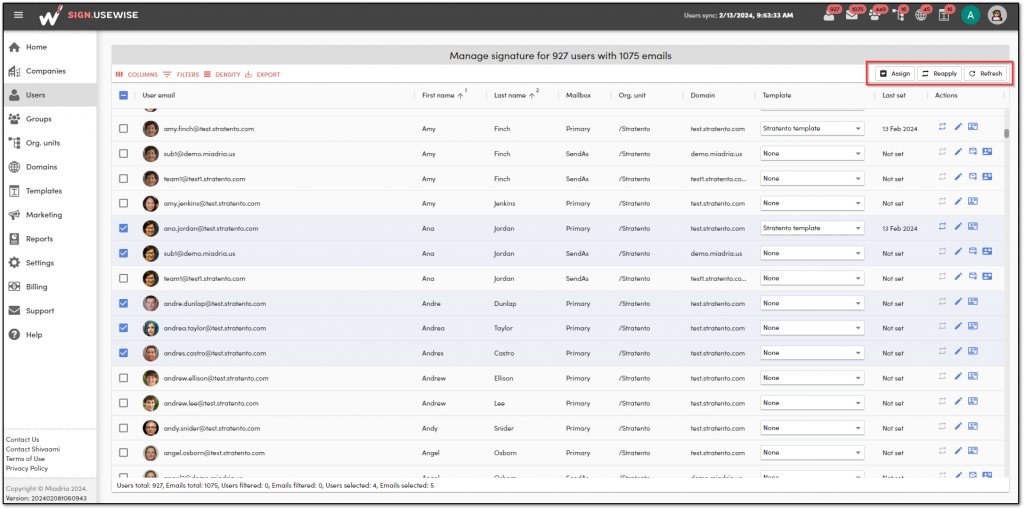
To apply email signatures to all or several users at once, either select all users by checking the box at the top of the users table or individually select users within the table, and then click on the Assign option located in the upper right corner.
Setting signatures for multiple users at once
A dialog box will prompt you to choose a template. From the drop-down menu, pick the template you wish to use and click on Select template. Upon completion of the setup, a confirmation message will appear at the bottom of the screen.
Reapplying template
In case you made some modifications to the signature template on the templates page, and you want to make those changes visible in email signatures, you will need to reapply the template again to push the updated version of the signature to users’ Google Workspace. To do that, from the actions menu, select the Reapply template option andclick on Set signature to confirm.
Reapply template option
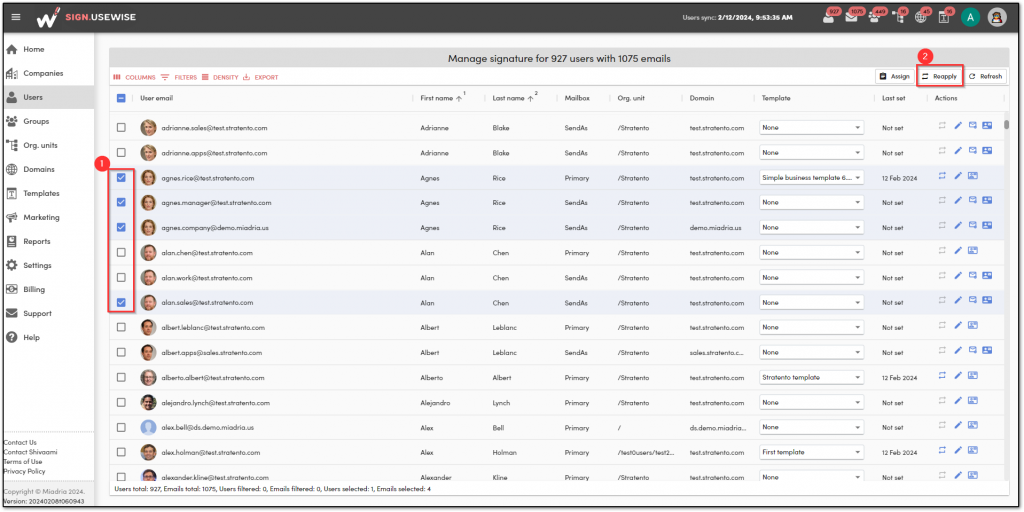
If you want to reapply the template to all or multiple users at once, select them and click the Reapply option in the top right corner. Confirm the action by selecting the Reapply template in the dialog window.
Reapplying template to multiple users
Setting and managing the “Send As” address for the user
Creating an email alias lets the user receive an email at that address. To send an email with the alias address in the From field, a custom From address needs to be configured. Send As email addresses can be aliases or other addresses that the user owns and wants to send emails as that address. Learn more about sending emails from different addresses in Gmail in Google article.
With Sign.UseWise®, you can set multiple Send As addresses for your users with just a few clicks and give them additional email addresses at no cost. Users’ alias addresses will be displayed under the primary address and marked as Send As addresses in the mailbox column.
1. To set Send As address, go to Users page and under the actions menu select Create new Send As.
Setting Send As address for user
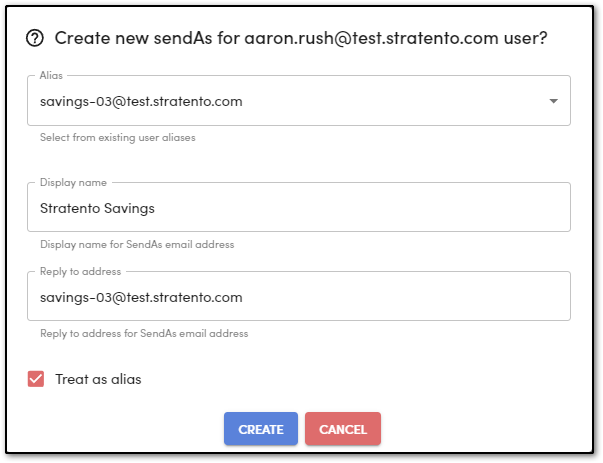
2. In the dialogue window first select one of the existing alias addresses for the user. Next, enter the display name (the one that is shown in the from field in Gmail, next to the email address) and specify the reply-to address.
Setting Send As address for the user
3. Click Create when you are done editing. New Send As address will appear under the user’s primary email address as well as in Gmail.
Removing the “Send As” address for the user
When no longer needed, Send as address can easily be deleted. There is an option Remove Send As under the actions menu, just select it and click on Remove to confirm the action.
Remove Send As address option
The Send As address will be automatically removed and user won’t be able to send emails from that address.
Changing the default “From” address
Within the actions menu, you’ll find an option to modify the default sending address. This great feature enables you to easily update the default user sending address without the need for end-user intervention.
To update the default “From” address, simply choose the desired address and click on the Make default option. A dialog box will appear, prompting you to confirm your selection by clicking Make default once more.
“Make default” option
This change is automatically applied to the end user, allowing them to immediately start sending emails from the new default address.
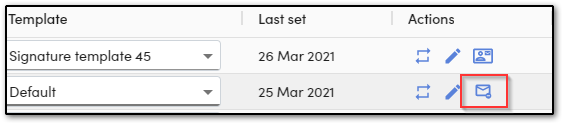
Setting signature for “Send As” address
Once set up, the Send As address will be visible under the user’s primary address like in the example below.
Send As address
Assigning a signature template to Send As address is done in the same way as for a primary address: simply select one from the templates from the drop-down menu and click on Set signature. There is also an option to reapply the template again if some modifications were made to the existing template.
To edit the signature for a specific Send As address, select the edit icon under the actions menu, make the necessary changes and click Save when finished.
Bulk actions
The following bulk actions are available on the Users page: assign template, reapply template and refresh. They will be greyed out if no user is selected from the table.
Bulk actions
To assign the same signature to multiple users at once, select the users and click on the Assign button. Next, you need to select the template you wish to apply. Click on the carrot icon to see the full list of all your templates. Choose your template and click on Select template.
There is also an option to Reapply the template and push the updated version of the signature. Select the users and click on Reapply in the upper right corner of the app. To load changes from the Google Workspace directory select Refresh. Depending on the number of your users it may take a few seconds to load changes.
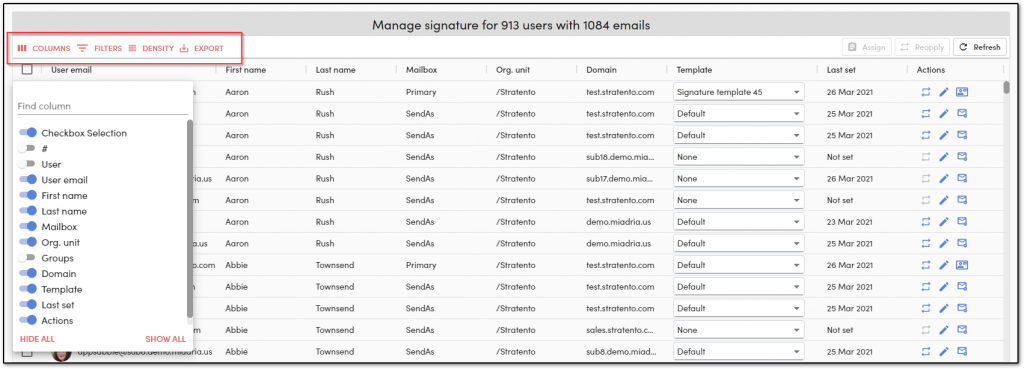
Table options
All tables in the Sign.UseWise® app have several customizing and filtering options available. Select the column visibility in the upper left corner and check/uncheck columns you don’t wish to see.
Table options
You can change the table density to compact, standard or comfortable. There is also an option to export data and download it as a CSV file.
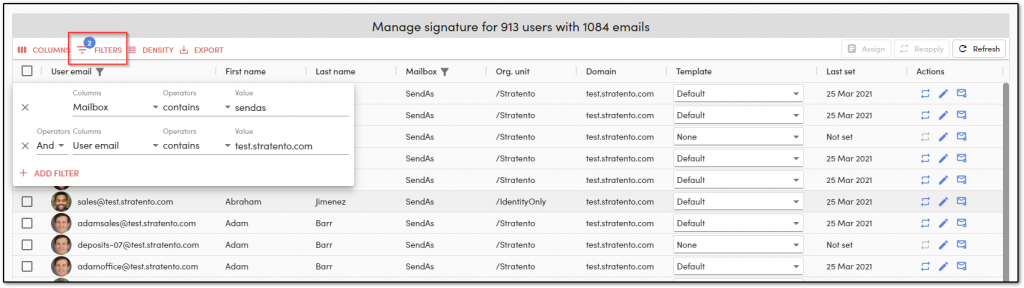
Filtering options
With filtering, you can choose how you want to display your data based on the column name, operators and value. In the example below there are two active filters. One filters out only users’ primary address (not Send As) and other email addresses from a specific domain.
Filtering options
Additional options available within each column are: sort by Asc, sort by Desc, Filter, Hide and Show columns. Repeat the step for each column you would like to filter and combine filtering options.
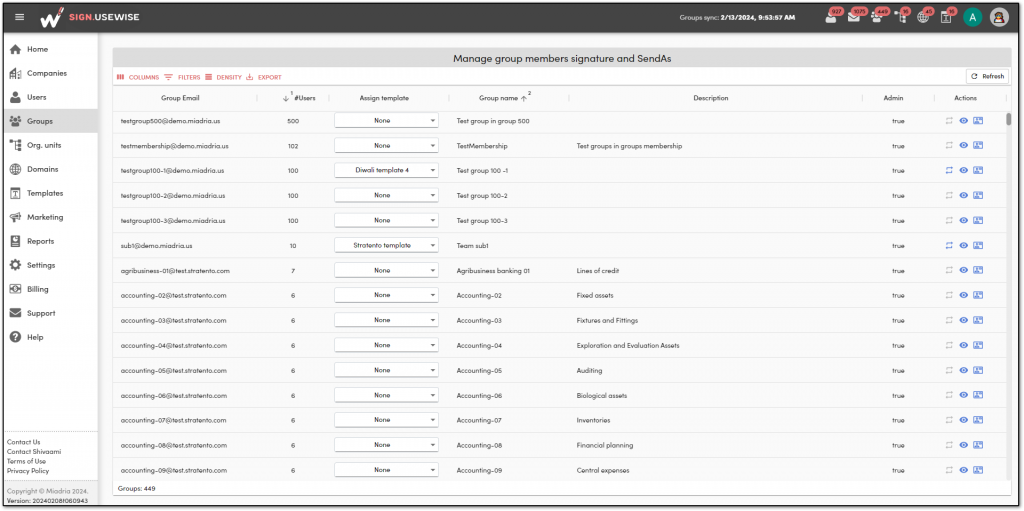
The groups page gives a preview of all directory groups and group members as Sign.UseWise® synchronizes group information directly from Google Workspace.
If you have a group setting that reflects departments in your organization, you can set different signatures for each of those groups/departments. The recommendation is that your directory groups are sorted in the Google Workspace admin console so that you can manage group email signatures in Sign.UseWise® with ease.
The group table gives you a preview of all groups, the number of internal users within each group, assigned template, group name and description. You can also see whether it is an admin-created group or not. The last column shows actions you can do with a single group:
Reapply template
View group members
Manage Send As for group members
Groups page
The table is adjustable and you can move the columns around by clicking on the column name and dragging it to another location within the table. On hover over the column name, three dots are shown with a menu for filtering options and an option to hide a column.
Additional table options are in the top left corner where you can check which column you want to see, do some filtering and change table density.
To export group data, simply click on the Export > Download as CSV and the .csv file with all the data will be automatically downloaded to your computer.
Use the Refresh button in the upper right corner to check if any changes were made to groups in the Google Workspace admin console.
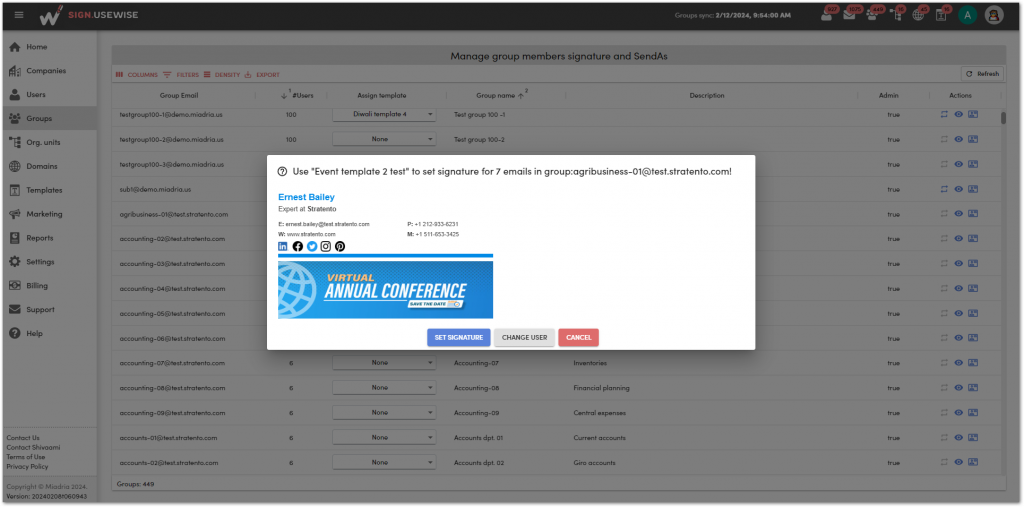
Setting signatures for a group
When selecting a certain group, you have the option to assign a signature template to that group by selecting a desired template from the Assign template column. A dialog box will be presented showing you a preview of the signature and asking for confirmation. Optionally, you can preview a signature for another user by selecting Change user and selecting the user from the drop-down menu. To apply a template to the group click on the Set signature.
Setting signature for a group
In case you have made some modifications to the already assigned signature template and you want to update your users’ signatures, select group and click on Reapply template in the action column of the table. In that way, an updated version of the signature template will be applied. To see who is a member of a specific group, select View group members from the actions menu.
View group members option
Setting “Send As” address for group members
A special feature of Sign.UseWise® is the ability to set Send As addresses for direct group members. When added to a certain group in Google Workspace, members will be able to receive emails sent to that group (if they have the necessary permissions).
To send emails on behalf of that group a Send As email address has to be configured for each user and they will be able to see and select that address when composing or replying to an email in From: field of Gmail.
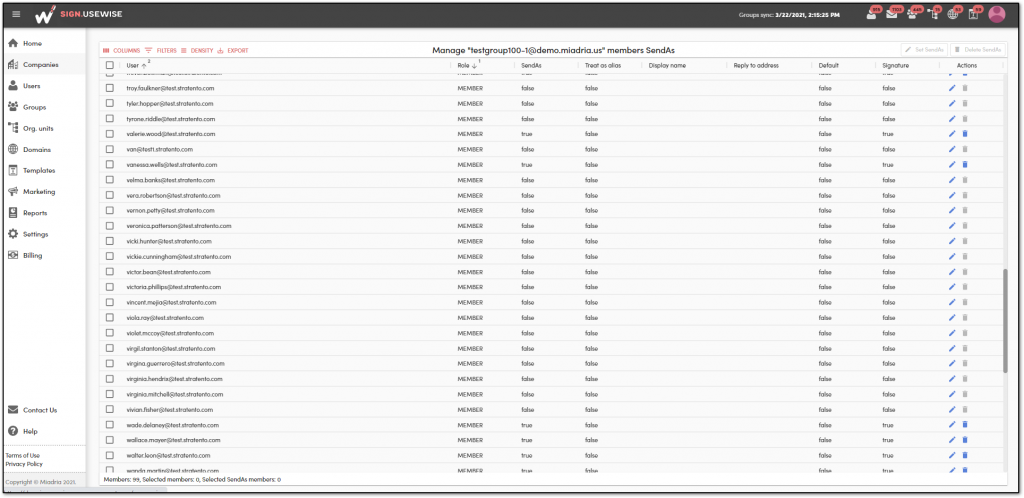
1. To set a Send As address, on the groups page, select the group for which you want to set Send As and click on Manage SendAs for group members under the actions menu.
Manage Send As option
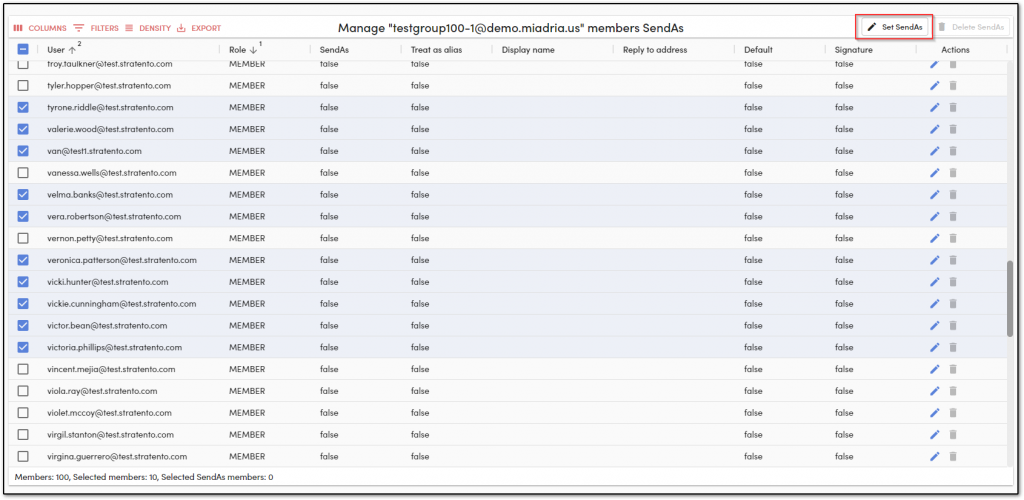
This will open a page with a list of group members. Here you will be able to see whether Send As has already been set for a specific user, as well as other details such as display name, reply-to address, and signature assignment status.
Group members preview
2. Next, select users for whom you want to set Send As and click on the Set SendAs button in the upper right corner.
Setting Send As for group members
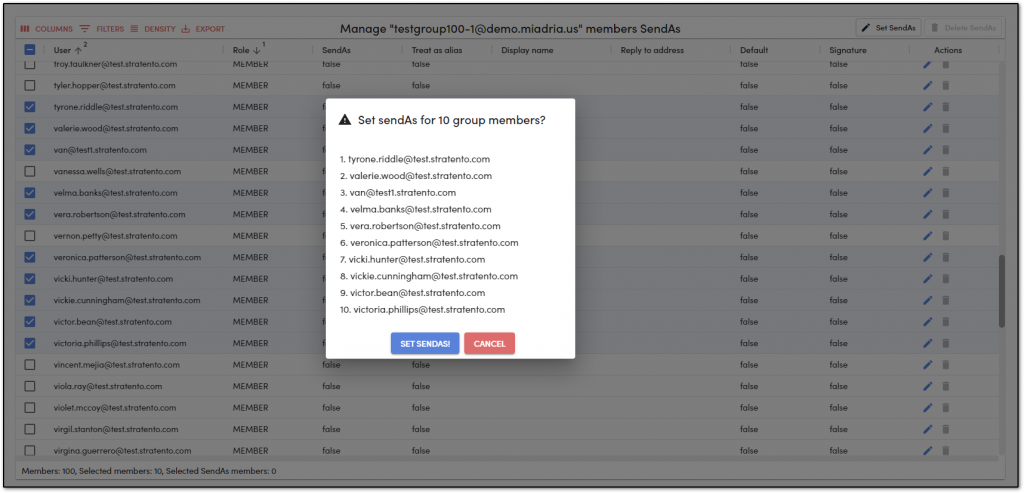
3. A dialog box will be opened displaying selected users. Click on Set Send As to complete the action.
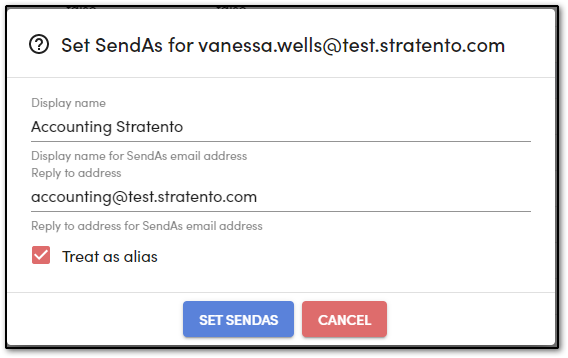
4. If you want to set Send As for just one user, select that user and click on Set or update SendAs under the actions menu.
A dialogue box will be opened asking you to enter the display name for Send As, reply to address, and whether you want to treat it as an alias or not.
Setting Send As for single user from the group
The display name is the name shown next to the address in Gmail From field, and usually, when setting Send As address for a group, the display name is the group name. Reply to address can also be group address but you can specify otherwise. Find more information about this in a dedicated Google article.
You can also specify if you want to treat that address as an alias or not. Learn more about this option in the Google article.
5. Once set, Send As address can be updated by selecting Set or update Send As under the actions menu or deleted by selecting the bin icon and selecting Delete Send As.
Deleting Send As address for a single user
6. To delete Send As for multiple users at once select them, and click on Delete Send As in the upper right corner.
Deleting Send As addresses for multiple users
Setting signatures for “Send As” addresses
Once you configure the Send As address for users or groups, you can set signatures for those addresses as well.
Navigate to the Users page, select Send As address for which you want to set a signature and select the signature template you want to assign.
In case you have many users, use filtering options to filter out the Send As addresses. For example, in the user email column enter the email address of the group and for the mailbox type set value Send As, and all users in the group with Send As address will be filtered and you can easily select them and assign a template to them.
Use the option Reapply the template in case you did modifications to the template and you need to push changes to signatures.
Remember that setting a signature for a group is not the same as setting a signature for a Send As address. On the groups page, you set signatures for a group of users, regardless of their ability to send emails on behalf of that group.
If a user has a Send As address and can send emails on behalf of a group, a signature for that particular address can be assigned on the users page without affecting group signatures.
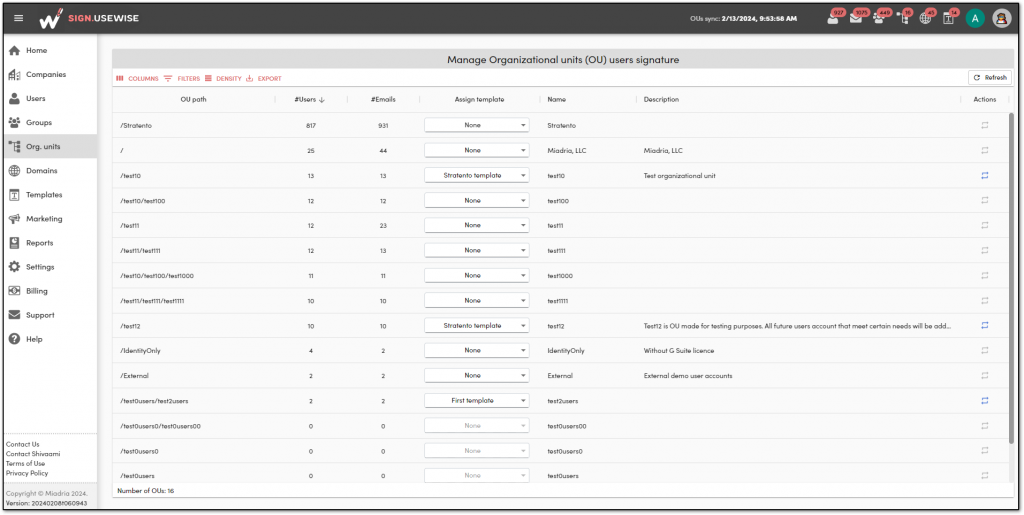
Some administrators may find it convenient to set and manage signatures on the Organizational unit level. The organizational units page is also synchronized with Google Workspace and reflects its organizational hierarchy – from the top-level organizational unit to child units. The organizational unit table contains the following information:
Organizational unit path
Number of users – number of users in specific OU
Number of emails – primary and Send As
Assigned template
Name of the Organizational unit
Description
Actions – reapply the template
Organizational units page
Setting signatures for Organizational units
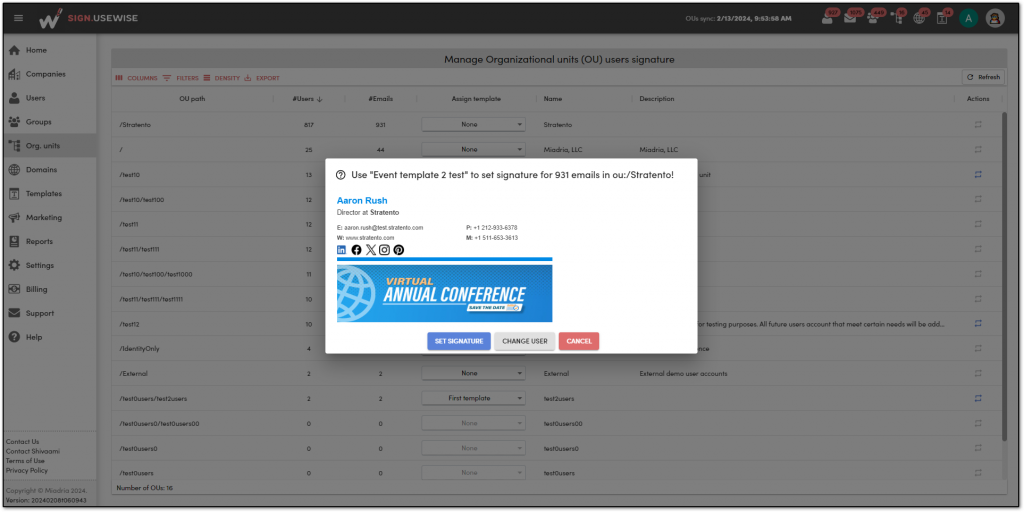
Setting a signature for the Organizational unit is pretty straightforward – simply select the template from the Assign template column drop-down list and the dialogue box with signature preview will open asking you to confirm the action.
Setting signature for Organizational unit
To preview a signature for a specific user select Change user and click on Set signature to complete the action.
If you have done some modification to a signature that has already been assigned to a certain OU and want to apply the updated version, from the actions menu select Reapply signature and in the dialogue box select Set signature.
Use the Refresh option in the upper right corner to load changes from Google Workspace.
Taking care of your domain is one of the crucial parts of your business and branding. Sign.UseWise® helps you keep track of your domains and enables you to get a closer insight into your company’s domains and set signatures for domains as well.
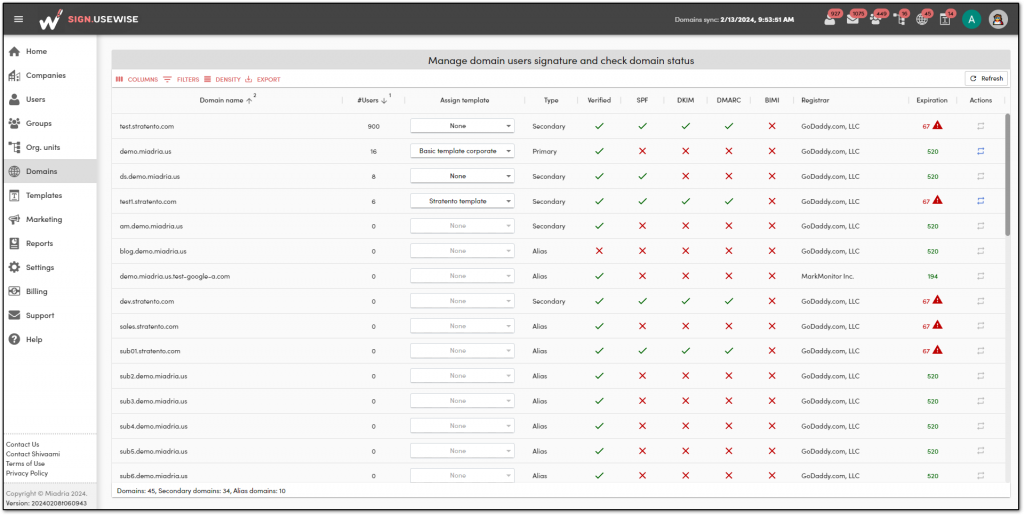
Domains page
On the domains page, you can see the type of domain (primary, secondary or alias), the number of email users, domain verification status, how many days till the expiration date and information about the domain registrar.
Moreover, you can find useful information on the status of email authentication protocols, which is a special feature of Sign.UseWise® app that helps to improve your email deliverability and safety. Types of records involved:
SPF – Sender Policy Framework defines the mail servers that are allowed to send mail for your domain. It helps to protect your domain against spoofing and prevents outgoing emails from being marked as spam.
DKIM – DomainKeys Identified Mail is used for the authentication of an email that’s being sent. DKIM adds a digital signature to every outgoing mail, which enables receiving servers to verify the email came from your organization.
DMARC – Domain-based Message Authentication, Reporting & Conformance uses SPF and DKIM to determine the authenticity of an email message. With DMARC, you define what to do with messages that dont pass SPF or DKIM (such as to reject the message or quarantine it).
BIMI – Brand Indicators for Message Identification is a standard that associates your brand’s logo with an authenticated piece of email. Learn more about BIMI here.
Combined together, these protocols can significantly contribute to your domain reputation. If you have all your records properly set, then the green tick will be displayed under each of these protocols in the Sign.UseWise® app Domains page. If that is not the case, you might encounter various issues such as your emails ending in recipients’ spam folders. Make sure you follow these instructions below to prevent that from happening.
Set SPF, DKIM and DMARC records
Setting SPF, DKIM, and DMARC records is essential for your domain reputation. To avoid issues like your emails ending in the recipient’s spam folder, you need to properly configure each of these protocols.
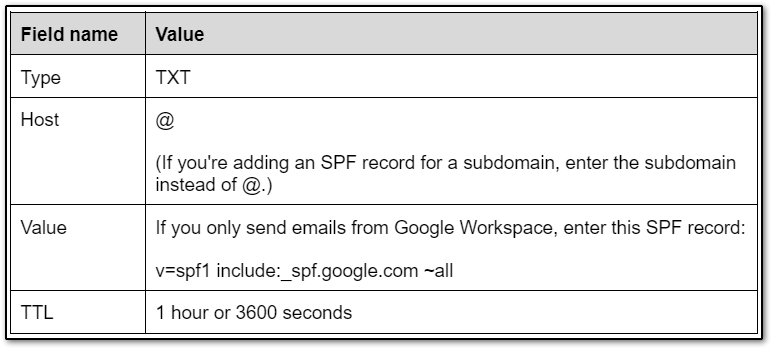
Set SPF record
We recommend reading through the Google support article regarding SPF setup, to learn more about this important authentication method.
First, set your SPF by logging into your domain registrar and locating the page where you update DNS TXT records for your domain.
Add a new record as follows and save changes:
If you send emails from other servers, you might want to look into the following Google support article to check how to include those as well.
Set DKIM record
Log into the Google Workspace admin console. Select Apps > Google Workspace and Gmail.
By default, your primary domain is selected. You can select another domain from the drop-down list. Select Authenticate email.
Click Generate new record and select your DKIM key settings. DKIM key bit length:
2048 – select this option if your domain provider supports it because longer keys are more secure than the short ones.
1024 – select this option if your domain provider doesn’t support 2048-bit keys.
At the bottom of the Generate new record box, click Generate. Copy the values shown in the window and sign in to your domain provider.
Find the page where you update DNS settings and add a TXT record for DKIM:
In the first field enter the Host name shown in the admin console
In the second field enter the TXT record value (DKIM key) from the admin console.
Save changes. Now return to the admin console to turn on DKIM signing. Select Apps > Google Workspace > Gmail.
For the selected domain, click Start authentication.
It may take some time for DNS changes to fully propagate (up to 48 hours) so once you see the status on the page is changed into Authenticating email, your DKIM is up and running.
Set DMARC record
Before setting DMARC, make sure the SPF and DKIM records are in place.
First, you need to define your DMARC record policy. Please, read the dedicated Google support article to learn how to prepare a DMARC record.
Sign in to your domain host and locate the page where you update DNS records.
Add your DNS TXT record in the following way: under the DNS host name, enter: _dmarc.exampledomain.com. For the TXT record value, enter the text for your DMARC record, for example: v=DMARC1; p=none; rua=mailto:dmarc-reports@exampledomain.com. Replace exampledomain.com with your own domain name.
Save your changes.
Note that setting DMARC record can vary from provider to provider, so make sure you carefully read through the entire Google support article to correctly configure your record name and value.
Setting signatures for domains
With Sign.UseWise® not only that you can keep track of your domains, but you can also set signatures on a domain level.
All signature templates that you created will be also listed on the domains page, in the Assign template column. From there you can choose which template you want to apply to a certain domain. Once you select a domain and choose the desired template, a dialogue will be displayed asking you if you want a set template for that domain. Select Set signature and the signature will be assigned to the entire domain.
Setting signatures for domain
To apply the same signature (modified) to a certain domain, simply click on the Reapply template under the actions pane and in that way push changes to existing signatures.
Once you have synced your Google Workspace data, and created a company profile, the next step would be to create email signature templates. There is an option to choose a premade signature template from the app gallery and modify it using the signature editor or to start from scratch.
User templates are templates created by users and they can be accessed and edited from the editor, by selecting the template name from the drop-down menu.
Gallery templates are provided by the Sign.UseWise® app and they are loaded to the gallery and carousel.
Every signature from the template gallery has its name, short description and tags, so it is easy to search through the gallery for a certain theme.
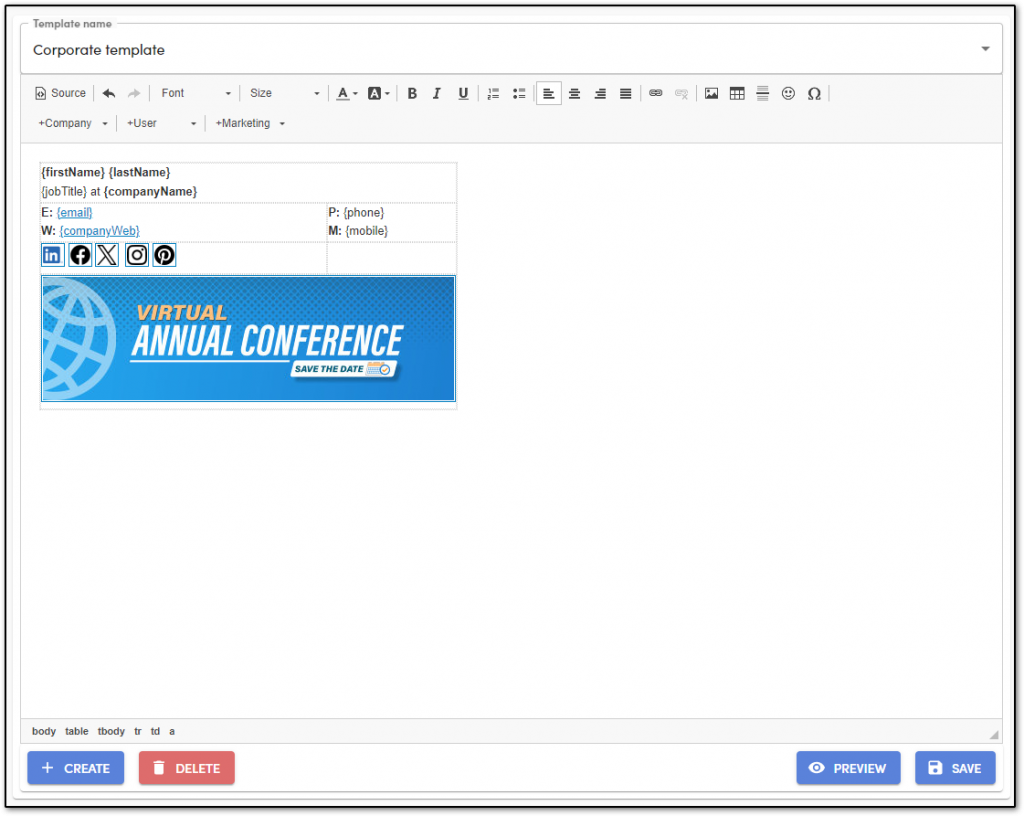
The signature template editor gives the possibility to create a completely new signature using the provided personal or company attributes, as well as the option to insert images, format text in various ways to add style to your signature. Users can paste their own HTML code and modify it in the editor.
Signature template editor
The advanced signature editor is one of the main features of the Sign.UseWise® app. The user-friendly signature editor enables you to change the look and feel of your signature using various formatting options such as changing the font type, size, color, adding a table or image and much more. Hover over the items to see a short explanation of what each option does and add text or image content to any part of your signature.
Email signature editor
With a signature editor, you can preview and edit your signature as HTML using source mode. Every time you add a new template or edit the existing one, make sure you hit the Save button before you leave the page.
Creating a new signature template
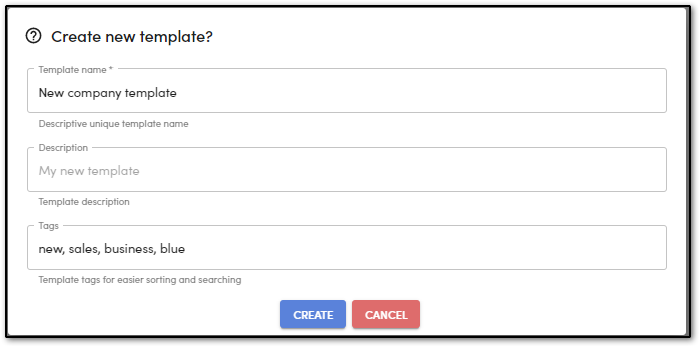
1. To create a new signature template, on the templates page, select Create. A dialogue box will open prompting you to enter a new template name, description and tags. When you are finished editing, select Create.
Creating new template
2. A new blank signature editor will be displayed and you can start creating your signature by adding placeholders, social media links or images. When done with editing, click Save. Your signature template will be saved and editable from the drop-down list.
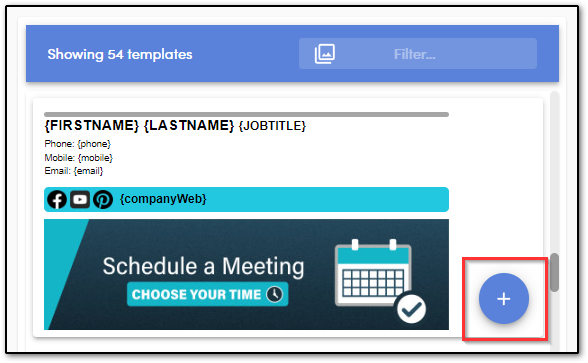
3. To use a template from the gallery select it by clicking on the plus icon on the template.
Adding a template from the gallery
4. Give your template a name and optional description and tags.
You will get a copy of that template and you can use it in signatures right away or do additional modifications in the editor.
When no longer needed, the template can be deleted. Select the template you wish to delete from the template name menu and then just click on Delete.
Inserting premade signature to Sign.UseWise®
If you already have an email signature template that you would like to continue to use or edit with the Sign.UseWise® app, you can easily insert that template into the app gallery.
1. On the Templates page, select Add new and enter the name, description and tags for your template.
2. Then simply copy and paste your existing signature to the editor and add the placeholders to be updated with the employee information.
3. For templates in HTML format, copy the signature HTML code and paste it into the HTML editor area (source) and save.
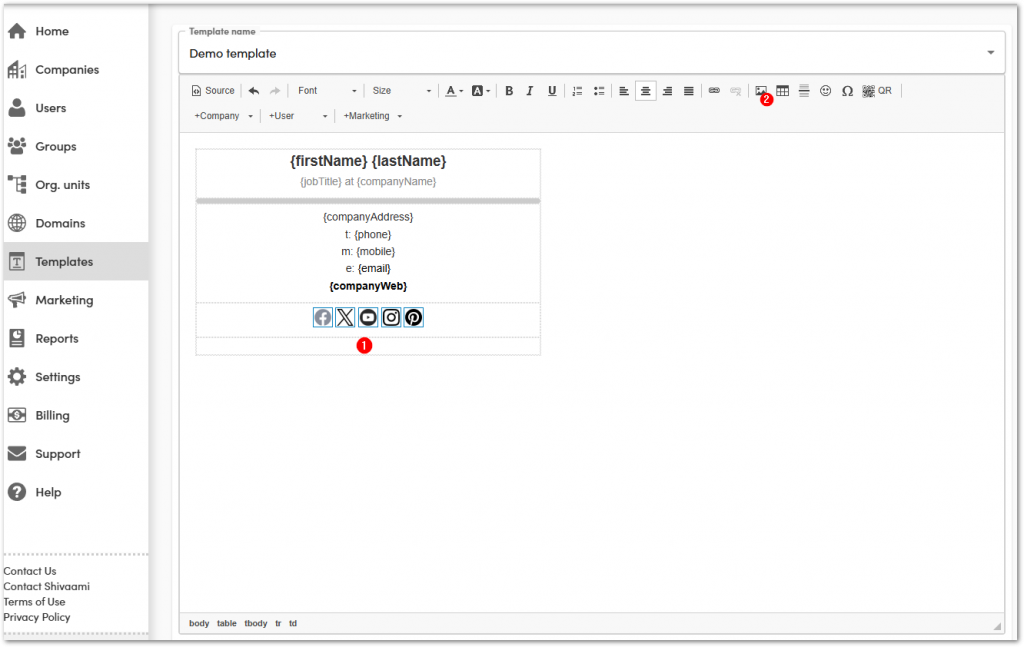
Using images in email signatures
To add an image to your email signature, first click on a location in the editor where you want to insert the image. Then, click on the Image icon on the toolbar.
Adding images to the template
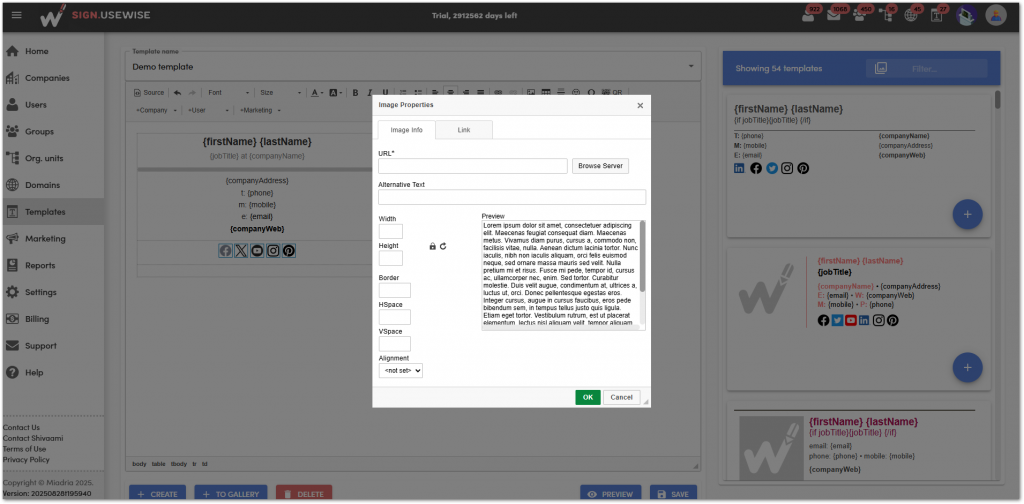
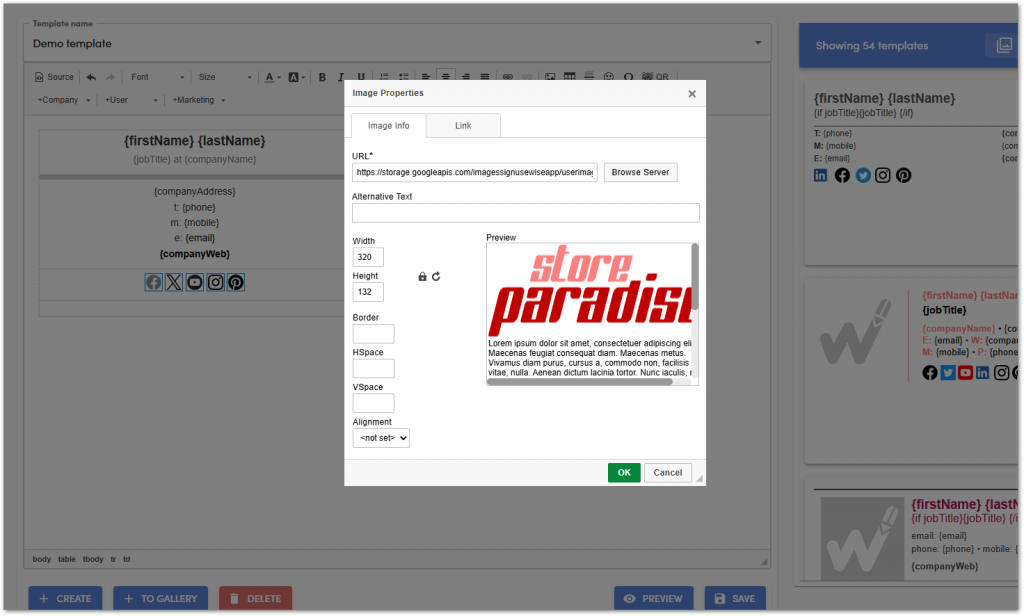
The Image Properties dialogue will be opened, where you will be presented with the option to add an image from a URL or upload one from your computer. You can upload images in the following formats:.jpeg, .jpg, .png, .gif. Image should not be larger than 256 KB.
Adding images to the template
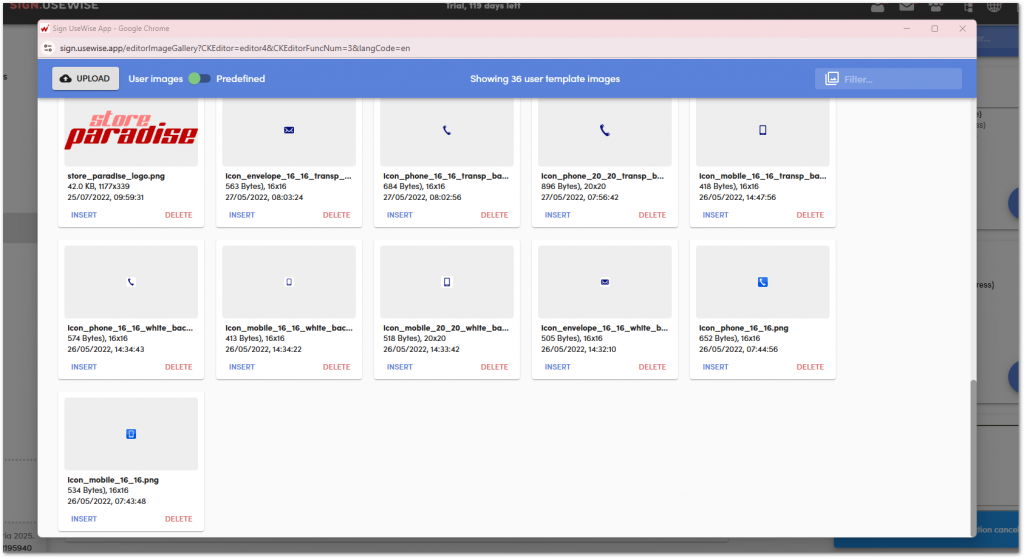
To add an image from URL, simply copy the image address and paste it into the URL text box. If you want to upload an image, select Browse server and then click on upload. Locate your image on the computer and select Open to add the image to the gallery.
Once uploaded, the image will be available under user images, from where you can insert it into the email signature template by clicking Insert.
Uploading images to the gallery
You can change the image size and its position, add a description, or make it clickable. For instance, you could link it to your website so that when someone clicks on the logo in your signature, they’ll be taken to your site.
Image properties
All the images that you upload will be automatically saved, and you can upload or delete them at any time.
Images saved on the server are categorized as user images or predefinedimages. You can choose whichever predefined app image you want and use it in your email signatures, but you cannot delete them. You can delete your user images when you no longer need them.
Important: Email clients like Outlook often rescale images, ignoring the specific width and height settings you apply in email signature editors. This can cause your images to appear larger than intended, especially when an email is replied to or forwarded.
To prevent this, it’s best to upload images to the Sign.UseWise® template editor at their exact desired dimensions. For example, if you want your logo to be 100px by 100px, upload it at that size. Avoid uploading a larger image and then resizing it within the editor, as this is often where the issue arises. You can easily resize images using the most common image editing programs.
Company logo in email signatures
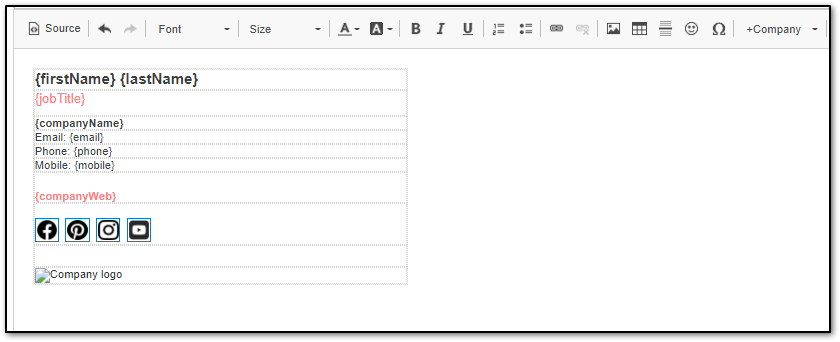
The best way to use a company logo is to upload it to the company profile and then insert it to the signature template using the logo placeholder.
During the creation of a company profile, there is an option to upload a logo as well. Once that is done and changes are saved, the logo can be inserted into the template by following these steps:
1. Go to the Templates page and select the desired template to edit.
2. Click on the area inside the editor where you want to place your logo.
3. Click on Company placeholder and select logo placeholder
4. Select preview to see the template with logo inserted and save changes to the template.
Inserting logo placeholderCompany logo placeholder
The logo will be visible when selecting the preview signature option.
Signature template preview with company logo
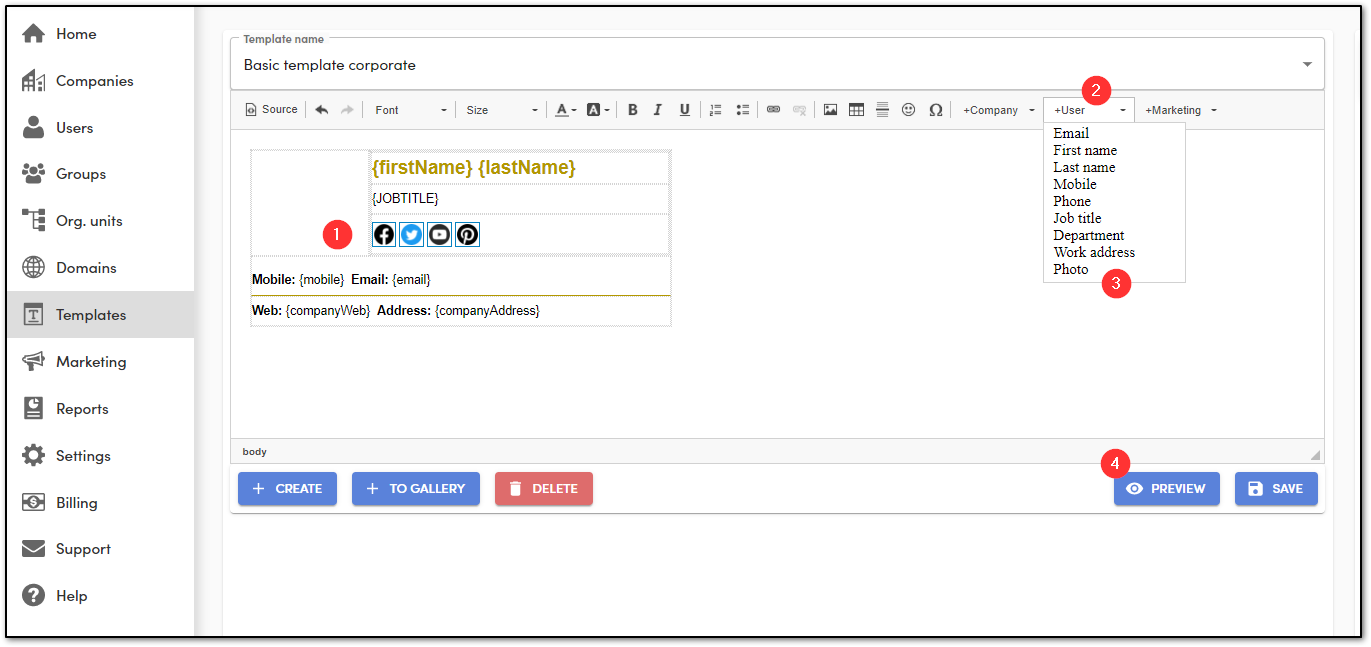
User profile photos in email signatures
Some users may have profile photos in their Google Workspace account that they want to display in email signatures. That can easily be done by inserting the special {photo} placeholder inside the email signature template.
1. Go to the Templates page and select the desired template to edit.
2. Click on the area inside the editor where you want to place a profile photo.
3. Click on User placeholders and select profile photo.
4. Select preview to see the template with profile photo inserted.
5. See the profile photo for a specific user by selecting the change user option. Save changes to the template.
Inserting profile photo placeholderSignature template preview with a profile photo
Adding vCards QR codes to the email signature
Sign.UseWise® makes it easy for people to add your contact info via a unique QR code. A vCard is a standard file format for electronic business cards. When you include one, recipients can quickly create a contact entry for you with just a click. When linking it to a QR code, you make your contact details scannable directly from any mobile device.
To add a QR code to your email signature template, follow these steps:
On the template page, select the template you want to edit and click in the area of the template where you want to place your QR code.
Click on the QR code option on the toolbar.
Inserting a QR code
The dialog box will open, where you can specify which Google Workspace user directory fields will be included in the vCard. You can also include the company information (information added to company profile within the application.)
Creating a QR code
To access more QR code settings, toggle the Expert mode. Now you can specify more advanced options such as QR code size, color, dot style and other settings to fit your brand identity. The error level setting determines how much damage a QR code can withstand and still be scannable, for instance, if it’s printed. For QR codes used solely in email signatures, we suggest setting an error level of 7%.
Creating a QR code
5. Once editing is complete, select Insert QR Code and save your template. Your QR code will be added to the email signature template, and its settings can be adjusted at any time.
User and company data in email signatures
The Sign.UseWise® app enables you to insert directory attributes into the email signatures. These dynamic variables are added as placeholders to the email signature editor and are automatically filled with user information pulled from the Google Workspace directory.
There are two types of attributes – Company and User attributes. Company attributes are being pulled from the company profile created within the Sign.UseWise® application. Learn more about how to create a company profile here.
User placeholders are being synced automatically from Google Workspace directory. Here are guidelines on how to add information to users’ directory profiles. Once you add user profile data, you need to refresh the Users page within Sign.UseWise® app. There is also an option to set daily sync with Google Workspace within application settings.
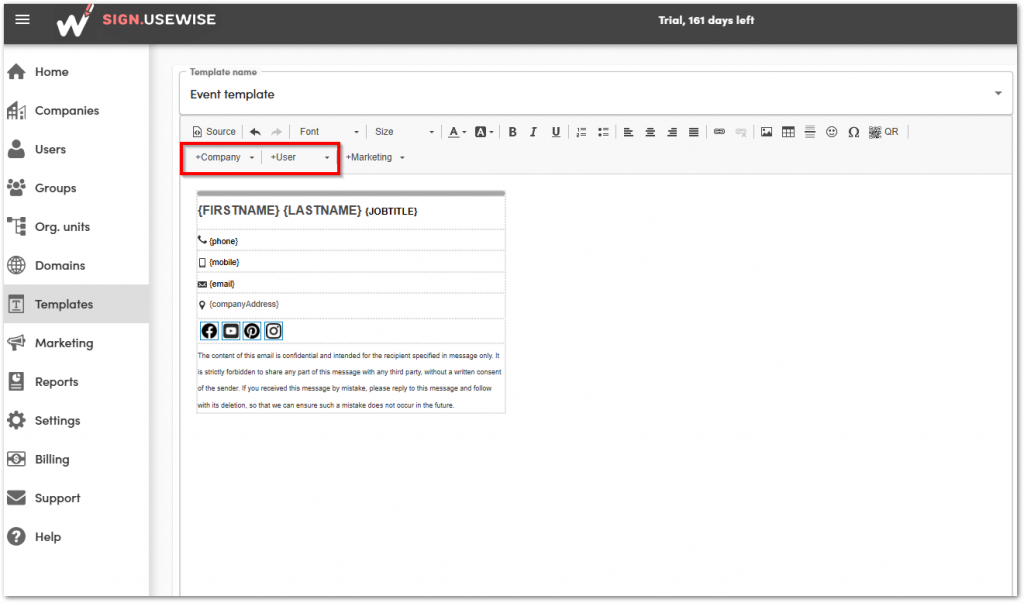
Placeholders can be inserted into the email signature template using the User or Company drop-down menus in the signature editor.
List of predefined attributes in Sign.UseWise®
User Attributes
Name
Text to insert
Email
{email}
First name
{firstName}
Last name
{lastName}
Mobile
{mobile}
Phone
{phone}
Job title
{jobTitle}
Department
{department}
Work address
{address}
Photo
{photo}
Custom
{customSchemas}
Company attributes
Name
Text to insert
Name
{companyName}
Web
{companyWeb}
Email
{companyEmail}
Address
{companyAddress}
Phone
{companyPhone}
Fax
{companyFax}
Tagline
{companyTagline}
Linkedin
{companyLinkedin}
Youtube
{companyYoutube}
Facebook
{companyFacebook}
Twitter
{companyTwitter}
Instagram
{companyInstagram}
Pinterest
{companyPinterest}
Wechat
{companyWechat}
Logo
{companyLogo}
Adding custom attributes
With custom attributes, you can define which additional user-specific data you would like to display in your email signatures. You can use custom attributes every time you need to display data that is not covered by predefined user placeholders.
Adding custom user attributes such as, for example, a link to a Facebook profile or Skype name, is possible using custom schemas. Custom fields/schemas first have to be added to Google Workspace and then mapped to user placeholders in the Sign.UseWise® app.
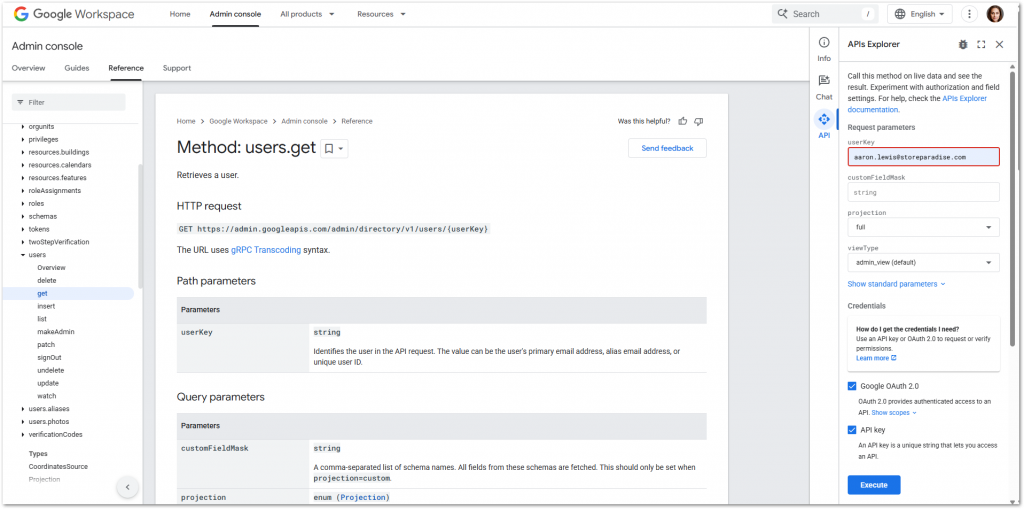
Currently, custom attributes need to be added manually into the email signature editor using the Directory API to list all user attributes. The Directory API is used to create and manage resources attached to your Google Workspace domain, such as users, org charts, and groups.
Go to the Directory API and log in with your admin account. Under the request parameters, enter the fields as follows:
First, select the API explorer in the right sidebar.
Under userKey enter your admin email address.
Under projection, select full.
Under viewType select admin_view (default). When done, select Execute. If prompted, log into your admin account and select authorize the API.
Directory API explorer
Below the execute button, you will get results and directory profile information for the specified user. Scroll down to find the section labeled customSchemas and locate the attribute you want to add to the email signatures.
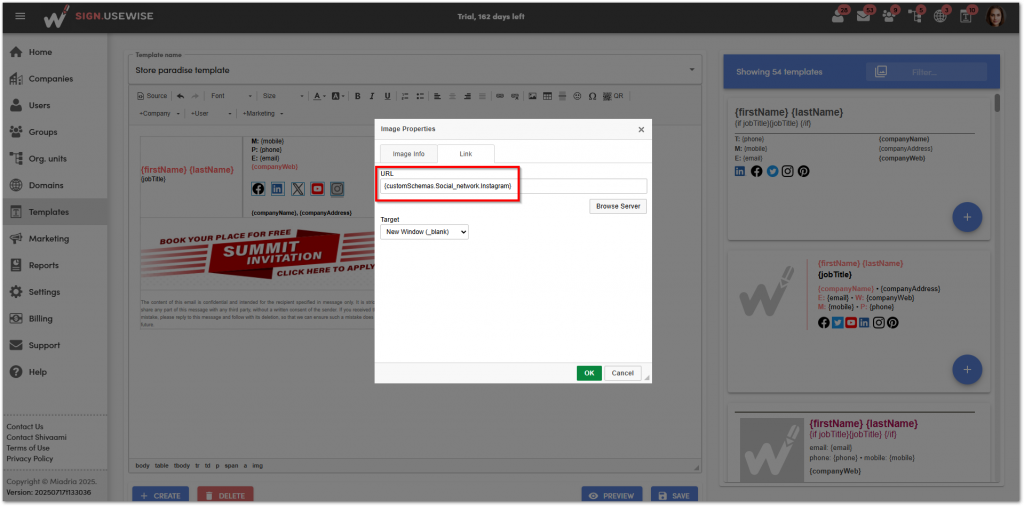
Enter all attributes separated with dots for example {customSchemas.attribute name}. In the example below, we want to add user Instagram, and we need to list all the attributes.
Custom attributes
7. First attribute to list is customSchemas, then Social_network and lastly Instagram, so the placeholder for Instagram attribute would be: {customSchemas.Social_network.Instagram}. Your response will probably be slightly different, but the process is the same – you just have to list all the attributes.
8. You need to add this into the body of the email signature or add it as a link to the social media icon of your choice, so when somebody clicks on it, it will take them to the Instagram page of a user.
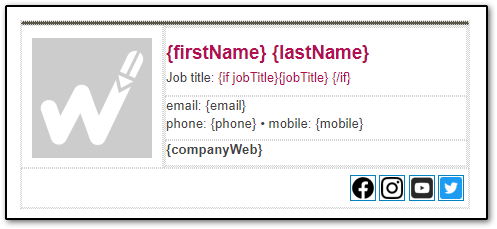
With conditions, you can display user details (attributes) in signatures that are not empty. It is done by adding conditions to the signature template using the If/else statement.
For example, with the following statement, you will ensure that the job title will be displayed only for those users who really have one:
{if jobTitle} Job title: {jobTitle} {/if}
Email signature with conditional statement
There is also support for else statements. With the following if/else statement we define what to display in case a certain attribute is not present.
{if phone}Phone: {phone}{else}{companyPhone}{/if}
In the example above, if the user doesn’t have a phone number listed, the company phone will be displayed instead.
Emails are the main part of business communication and they can be a perfect promotional tool when combined with Sign.UseWise® Marketing planner. If your company uses advertising, organizes events, promotes new products or services, you can benefit from promotional banners that can easily be included into every email signature.
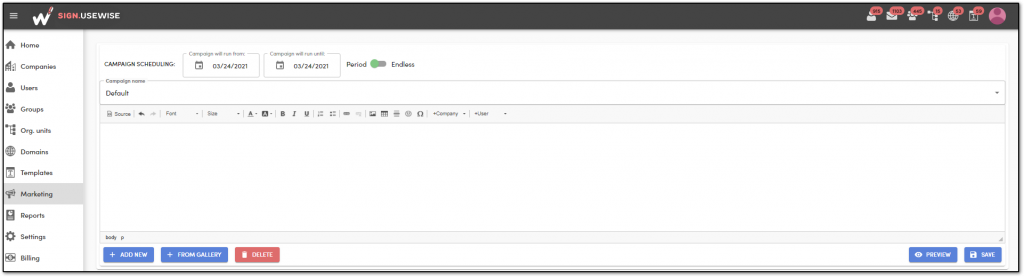
Campaigns are created on the Marketing page, where promotional content is added via the editor.
Note: To ensure the effectiveness of your marketing campaign, it’s essential to activate the automatic application of email signatures for daily templates. You can find instructions on how to enable this feature in this section of the help page.
Marketing page
Creating and managing marketing campaigns
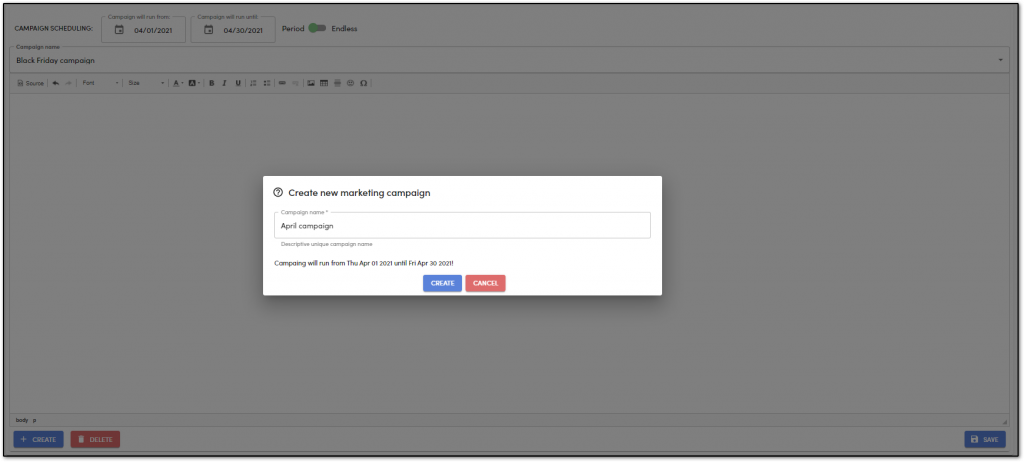
1. Navigate to the Marketing page and start creating your campaign by selecting Create and giving your campaign a meaningful name.
Creating Marketing campaign
2. You can schedule its appearance using the integrated calendar or choose to run your campaign endlessly.
Scheduling Marketing campaign
3. Next, add your marketing content to the editor, for example, a promotional banner using an image button from the editor toolbar. Do additional modifications to the content if necessary and click Save when you are done. You can edit and change campaign details at any time.
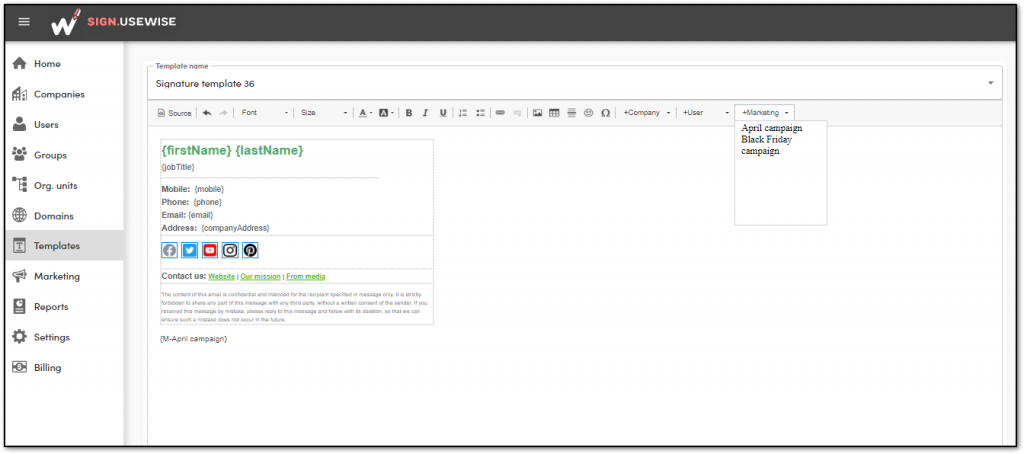
Adding campaigns to email signatures
For each campaign created a special marketing attribute is generated automatically. To add marketing content to your signature, simply insert the {marketing} placeholder to your signature template following the steps below.
1. Go to the Templates page and from the Template name drop-down list select a template to which you want to add the campaign.
2. Select the place in the template where you want to add your content and click on the Marketing button. Find the name of your campaign in the drop-down menu and select it. Click preview to see how your signature looks and click Save when you are done editing. The attached marketing campaign will be visible in every email for a selected period of time.
Adding Marketing campaign to signature template
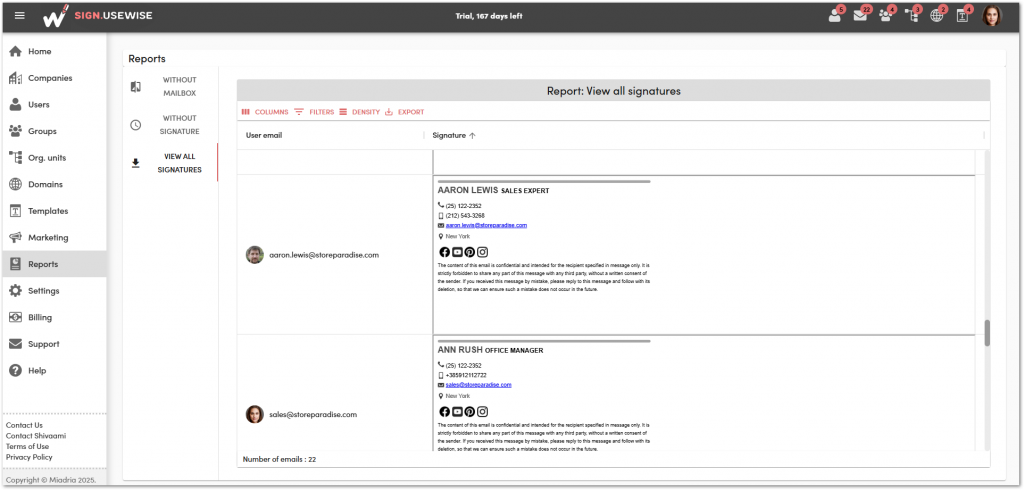
Reports
Access various useful reports on the Reports page, where you can filter or download them as CSV files. To see reports that are up to date, make sure you first refresh the Users page. Explore the following reports:
Without mailbox – shows users that have no mailbox (for example, users with Cloud Identity license)
Without signature – shows users that currently have no signature assigned
View all signatures – a preview of all user emails and signatures
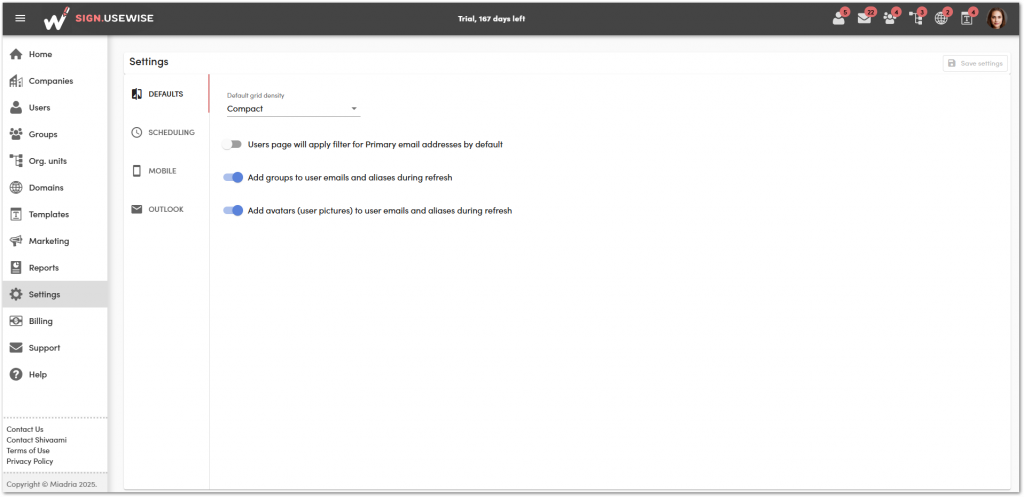
On the settings page, administrators can preview and edit the following settings:
UI defaults: Change the defaults for grid density to compact, standard or comfortable. Turn on or off other settings, such as applying a filter to the user’s primary email address and refreshing preferences for groups and user profile photos. To change the setting, simply toggle the option and select Save settings in the upper right corner.
Application settings
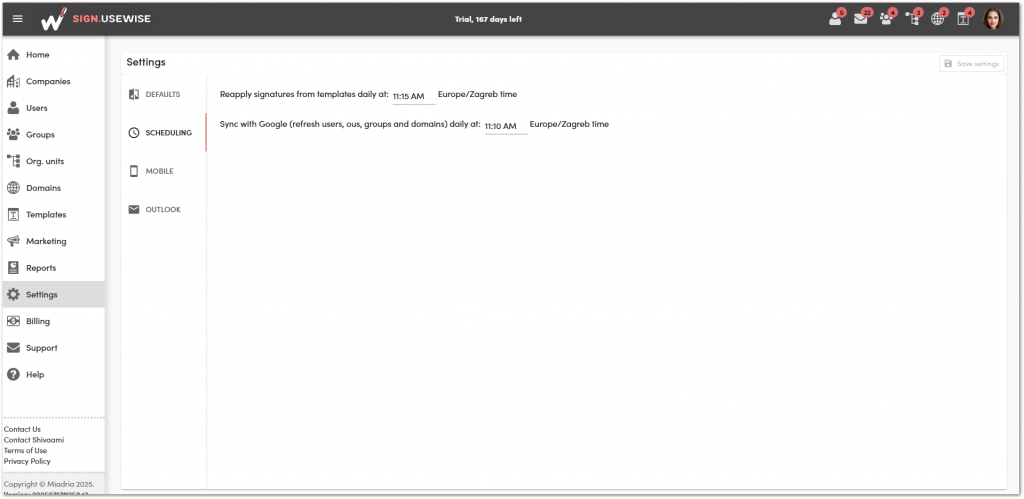
Scheduling: Reapply signatures from templates by selecting the desired time and schedule synchronization with Google Workspace (refresh users, OUs, groups and domains) daily at a specified time.
By choosing a specific time each day to reapply signatures to templates, you ensure that the correct email signatures are consistently applied to all your user emails daily. By syncing with Google, you can ensure that any modifications made in Google Workspace, such as updates to a user’s profile information or group membership, are accurately mirrored in the Sign.UseWise® app.
Scheduling options
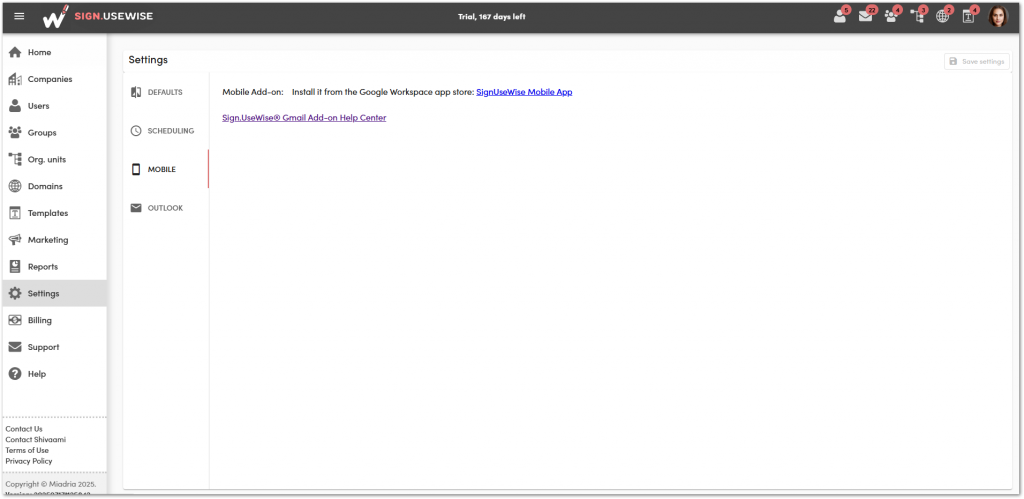
Mobile: Sign.UseWise® supports email signature set up on mobile phones (Android and iOS) with the use of a dedicated add-on that administrators can install from Google Workspace Marketplace. On this page, you can find the direct link to Sign.UseWise® add-on marketplace listing. Learn more about the add-on here.
If you are a super admin for your domain but want another user from your organization to be able to administer and manage Sign.UseWise® app, you can assign them with certain admin roles and privileges in the Google Workspace admin console.
You need to create a custom role in the Google Workspace admin console and assign that role to a user from your organization that will be responsible for managing Sign.UseWise®. Find out how to create a custom role in the following Google article.
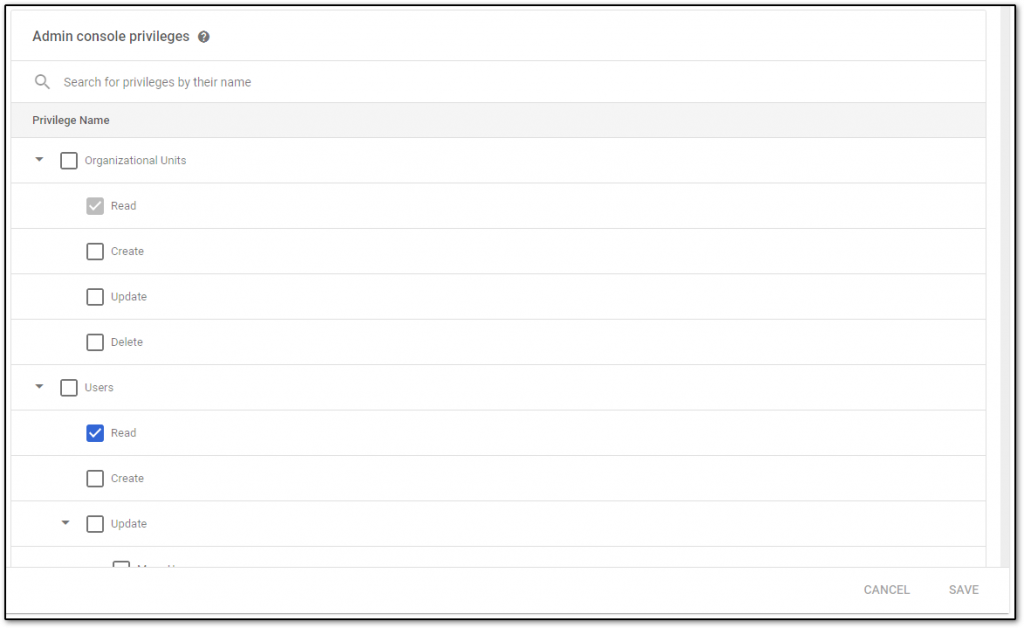
The user should have the following Admin console privileges:
– Organization units: read
– Users: read
The following Admin API privileges are also required:
– Organization units: read
– Users: read
– Groups: read
Creating Sign.UseWise® custom role
Sign in to the Google Workspace admin console with your admin account.
Select Account > Admin roles and click Create new role.
You can name your role Sign.UseWise® role/admin role and click Continue.
From the list of privileges make sure you select the following ones: Organization units: read, Users: read.
Scroll down to Admin API privileges and check the following: Organization units: read, Users: read and Groups: read.
Select continue and click Create role.
Creating a custom role
Now you can assign this role to users who need to manage Sign.UseWise® app. Watch a step-by-step guide in the video.
Known issues
In the following sections, we will describe some issues that you may encounter when using Sign.UseWise®. Soon the new version of the app will be available with all issues being fixed. Till then, you can use the workarounds described and let us know if you need any assistance.
Sign.UseWise® load
When logging into Sign.UseWise® or trying to upload an image to a gallery, a blank window may open. Press CTRL+F5 to load the app.
Sign.UseWise® updates
We are continuously working on improving Sign.UseWise® app and enhancing user experience, so from time to time, when logging into Sign.UseWise® to see new features and improvements it may be necessary simply to press CTRL+F5 to load the new app version.
Daily refresh
If you are having difficulties with your signatures not being reapplied from the templates when scheduling is set, you just need to log in to Sign.UseWise® app and refresh data on one of the pages (users, groups, OUs or domains) and the daily refresh will function properly again.
Deploying Sign.UseWise® for groups and OUs
There is an option to deploy Sign.UseWise® just for specific groups or OUs from Google Workspace. The app will sync information about all Google Workspace groups and OUs, but you will be able to set signature (and will be billed) only for those user accounts that are placed into groups/OUs that you specified during deployment.
We value your privacy
We use cookies to ensure our website functions optimally and to personalize your browsing experience. By clicking "Accept all" you consent to the use of all cookies. You may adjust your preferences anytime by clicking the Cookie Icon. For more details, please read our Privacy Policy.